2009 Acura Mdx Headlight Bulb Replacement

2007 Toyota Prius Touring EditionEnlarge Photo There's nothing the media love more than a nice juicy auto problem. Imagine that your car's headlamps failed, and replacing them cost you THOUSANDS. Well, that's the premise of a late June story in AdAge, which discussed a potential problem with the optional xenon high-intensity discharge (HID) headlights fitted to the second-generation Toyota Prius in model years 2005, 2006, 2007, and 2008. The National Highway Traffic Safety Administration has received hundreds of complaints from Prius owners about HID lamp failures and, according to the story, opened a preliminary investigation into the matter. The AdAge story cites 338 complaints received, although our search of the NHTSA complaints system produced just 117 listings for complaints about the 2005-2008 Toyota Prius categorized under "Exterior Lighting-Headlights". The bulk of them (80) were for the 2006 model year. And it's worth noting that those complaints covered all headlight problems, not just those having to do with the HID lights.

Many of the complaints cite dealer repair costs exceeding $1,000, in some cases as high as $1,800 to replace two entire HID light units and two control modules, which are electronic components that provide power to the lights.
Kohler Toilet Parts Gasket We'll wait to see what the NHTSA comes up with, but as commenter Dan Stern on the AdAge story notes, headlight bulbs are a consumable item for cars--like wiper blades, brake pads, and tires.
House For Sale CaddingtonWhich is to say, sometimes they do fail and need to be replaced.
Travel Blackout Blinds Nursery Whether they are failing at a higher rate than expected will depend on statistical analysis, and the NHTSA wrote to Toyota in May asking for more data. The HID bulbs have a rated life twice as long as standard bulbs, and give three times the light while using about half the power.

But they're also much more expensive: the list price for one bulb is $150, against $12 to $15 for a standard headlight bulb. We suspect the high cost of a new HID bulb may come as a shock to Prius owners, making them more likely to suspect a defect. It may be, as Stern suggests, that unscrupulous dealers are exacerbating the high cost of the bulbs. They may be imposing exorbitant labor charges for unnecessary work, like removing the Prius front bumper shield to swap out a dead bulb, or even replacing entire HID units at $330 apiece. Replacing a single Prius headlight bulb, according to the service manual, takes less than 15 minutes. It may also be that the problem lies not with the lights themselves, but with a $250 control module and/or associated wiring. Meanwhile, perhaps inevitably, a lawsuit has been filed in Los Angeles on behalf of a Toyota Prius owner in Putnam County, New York. The firm of Girard Gibbs is seeking class-action status for their suit, calling the bulb failures "a dangerous but undisclosed safety defect."

This reminds us somewhat of the supposed Prius "sudden acceleration" issue, in which a handful of owners claimed that their hybrids experienced complete brake failure while accelerating wildly out of control. If you have a Prius with HID headlights, and one of your bulbs fails, it may be worth trying to repair it yourself. Dealers can charge you $175 to $350, but with a little care and some tools, you should be able to follow the instructions in your owner's manual. And you can find replacement HID bulbs for little more than half the Toyota price of $150.00. The bulb type is D2R, and they're perfectly standard replacement items used in multiple vehicles besides the Prius. As always, Google (or any other search engine of your choice) is your friend here. MORE DETAILS: "Headlight problems" on PriusChat MORE DETAILS: "Replacing headlight bulb on Prius" on HybridCars 2008 Toyota Prius TouringEnlarge PhotoH11 (12362) Bulb | Philips Automotive 12362B1 Standard HeadlampThe Philips Automotive 12362B1 bulb is a DOT compliant, 55 watt, 12 volt light bulb of original equipment quality that emits bright, clear light providing better visibility on the road and overall safer driving.

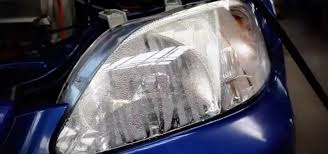
Cornering LightDaytime Running Light BulbFog Light BulbHeadlight Bulb GE H11-55/BP StandardOsram Sylavnia H11 StandardPhilips Automotive 12362B1 12V 55W Standard BlisterWagner Federal Mogul BP1255/H11 StandardWhether driving during the day or night, headlights are important for oncoming traffic to see the approaching vehicle, and also to be able to find the way when it is dark. Condensation in headlights can be a safety issue in addition to causing mechanical problems. Condensation in headlights can dim car lights making a vehicle less visible to oncoming traffic. That dimness can also result in a decreased field of vision for the driver of the vehicle. A limited range of vision, especially at night on an unknown road, can be an accident waiting to happen. Maintaining headlight integrity is also important for the mechanics of the headlights. Condensation can cause electrical shorts and diminish the life of the headlight bulb. Headlight condensation can be prevented, but sometimes the problem has already occurred and can result in the necessity to replace headlights.

If necessary to purchase replacement lights, headlights can be purchased at automotive stores, department stores with automotive departments, as well as online from the eBay Motors Light Center. Headlight condensation is one of the biggest problems with headlights. When condensation occurs it can discolor headlights and cause cloudiness. Both of these issues reduce visibility, especially at night. Condensation is caused when the temperature of the headlight lens is decreased compared to the temperature of the lights themselves. Once the air heated by the headlights reaches the cooler lens, moisture is formed. This creates the condensation inside of the headlight. While this is the cause for most headlight condensation, in some instances the headlights may actually be leaking around the headlight housing, or the headlight may have a crack or other type of damage that is allowing moisture to enter. In order to prevent or remove headlight condensation, follow these steps to ensure that headlights are sealed properly.
Properly sealed headlights will maintain headlight and lens temperatures more evenly, and will prevent outside moisture from leaking into the headlights. Begin by removing the headlight assembly from the vehicle. Make sure to disconnect the electrical connectors and then pull the headlight out of the vehicle. Removing headlights from different vehicles will vary slightly from vehicle to vehicle; however, most removals will need similar tools. Normally a screwdriver and a ratchet are sufficient tools for the process regardless of the vehicle make and model. Make sure the ratchet has the appropriately sized socket necessary. Once the headlight is pulled out of the vehicle, remove the socket and headlight bulb. Make sure to remove any moisture present on the outside of the headlight. If moisture is present on the inside of the headlight, try using a blow dryer through the headlight socket. If any water is already trapped inside of the lens, a small hole may be necessary to drain the water.

Use a drill to create the small hole through the bottom of the headlight assembly. Before using a drill, however, try tilting the headlight to allow water to drain through the socket hole. If the water drains sufficiently, drilling a hole may not be necessary. Now, inspect the headlight assembly for cracks or other damage that can allow moisture to enter. Patch any small cracks or holes with a clear urethane sealant. If there are large cracks or holes, or extensive damage, the entire headlight may need to be replaced. Use Teflon tape to seal around the headlight bulb socket. The tape must be applied tightly to prevent moisture from entering through the rubber socket seal. Next, replace the bulb. Take sealant (a flowable silicone is recommended) and find where the headlight lens meets the housing. Inspect it for any damage, and apply sealant to any small holes or cracks in those areas. Using the silicone, apply a thick line where the lens and the housing meet. Make sure to get silicone into the crease, using a needle or hair pin to help with the process if necessary.

Follow around the housing with a trail of the silicone. Allow the silicone to dry for approximately one to two hours before reinstalling the headlights. Return the headlight assembly to the vehicle. Make sure all electrical connectors have been reconnected. Test this by turning the lights on before completing the re-installation process. Following these six steps listed above will prevent condensation from forming in headlights. Additionally, suggestions are given within these steps to remove condensation/moisture that may already be present. If condensation is already a serious problem, and there is considerable moisture within the headlights, it must be removed and then steps can be taken to prevent future condensation. In order to remove excessive condensation, follow the steps below. Remove the headlight assembly from the vehicle. This is normally a quick and simple process, and instructions can be found in the owner's manual of the vehicle. Open the vehicle hood.

Use safety measures to make sure that hood is propped open correctly and will stay open. Remove the screws, bolts, clips, etc., that will be holding the headlight assembly in place. Consult the owner's manual for the location of each of these. Pull the headlight assembly forward and unscrew the bulb socket assembly. Consult the owner's manual for the specific procedure to do this for the vehicle in question. Once the bulb and socket assembly is removed, remove the bulb from the socket. If the bulb is wet, set it aside to dry. For this step, a piece of cardboard and a baking sheet will be necessary. Cut the cardboard to the size of the baking sheet. Make sure to wet the cardboard with water before placing it on the baking sheet. Place the headlight assembly on the wet cardboard and slide everything into the oven. There is no need to preheat the oven, simply turn the oven to 250 degrees once the baking sheet containing the cardboard and the headlight assembly have been placed into the oven.

Make sure to keep an eye on the headlights, and only leave them in the oven for approximately three minutes, or whenever the condensation has fully evaporated. Use safety measures when removing the headlights as they will be hot. Lay headlights in the sun if any condensation remains. Allow the lights to dry until condensation has fully evaporated. Insert headlight bulbs back into the sockets. Return each headlight assembly partially into the vehicle. Screw the socket assembly, containing the bulb, into the back of each unit. Slide the headlight assembly into place and secure it with the original bolts, screws, or clips removed in the beginning of the process. Make sure to consult the owner's manual for proper placement of the fasteners. Follow these 10 steps for removal of condensation when there is too much moisture to simply dry the headlight assembly with shop towels and a blow dryer. Once this is done, go back to the steps for prevention of condensation to keep this from happening in the future.

If too much damage is done to the headlights or if future condensation cannot be prevented, it may be necessary to purchase new headlights. Purchasing headlights on eBay Motors is a straightforward process made simple by using the eBay Motors Light Center. A direct word search can be performed by simply typing the word "headlights" into the search query box. This will direct the search to a variety of headlights for various vehicles. Another option is to use the Light Center portion of the page. In this section, key in the make and model of the vehicle for which replacement headlights are needed. From there, use the picture descriptions to select headlights, tail lights, fog lights, etc. depending on which type of lights are needed. This search will yield the light type selected for the vehicle information provided. With the Light Center feature available to consumers, it is easy to purchase headlights from eBay Motors with confidence. To further ensure a confident purchase, always use a valid form of payment when making purchases from eBay Motors.

Valid forms of payment include debit cards, credit cards, and purchases made via PayPal accounts. Never use cash or checks to make purchases from eBay. A buyer can also check the validity of a seller by accessing eBay's feedback forum to check sellers' ratings. Sellers with the best ratings will be listed as Top-rated Sellers. Keeping headlights in good working order is a must for drivers. Headlights make vehicles easier to be seen by oncoming traffic, and they also allow for clearer vision when driving at night. Headlights that have condensation are a safety hazard as dim headlights and can make it harder to be seen by other cars. Condensation can also lead to yellowing or cloudiness of the headlight lens thereby limiting the driver's field of vision while driving at night. Prevent condensation by taking extra care to seal headlights and bulb sockets with silicone sealant and Teflon tape. Follow the steps provided in this guide to prevent or remove condensation. Steps are also provided for extreme cases of moisture.