Allure Flooring For Stairs

Vintage Oak Cinnamon 47 in. Long x 12-1/8 in. Deep x 1-11/16 in. Height Vinyl to Cover Stairs 1 in. Long x 1/2 in. Deep x 7-3/8 in. Height Vinyl Riser to be Used with Cap A Tread Vintage Oak Cinnamon 94 in. Height Vinyl Right Return to Cover Stairs 1 in. Brushed Oak Taupe 47 in Length x 12-1/8 in Deep x 1-11/16 in Height Vinyl Overlay to Cover Stairs 1 in Thick Sawcut Dakota 47 in. Rustic Maple Honeytone 47 in. Espresso Oak 47 in. x 12-1/8 in. Deep x 2-3/16 in. Height Vinyl Overlay to Cover Stairs 1-1/8 in. to 1-3/4 in. Canadian Hewn Oak 47 in. Length x 12-1/8 in. Height Vinyl Overlay to Cover Stairs 1 in. Clear Cherry 47 in. Country Pine 47 in. Vintage Oak Natural 47 in. Height Vinyl Left Return to Cover Stairs 1 in. Oak / Yukon Oak 47 in. Dove Maple 47 in. Length x 1/2 in. Height Laminate Riser to be Used with Cap A Tread Oak / Yukon Oak 94 in. Red Cherry 47 in. While allure flooring is the “Easiest Floor Ever”, it is not meant to be installed everywhere.

Some environments just don’t rest well with it. Here is a list of places you should never install allure flooring: 1. An unheated cottage- Sorry, we can’t recommend this. This product is for indoor, temperature-controlled environments only. You must acclimate the product in the room of installation for a minimum of 48 hours at a temperature between 65°F to 85°F. Also, avoid exposure to direct sunlight for prolonged periods of time as this may damage your floor. Use shades or blinds if the room gets long periods of direct sunlight. 2. A three-season porch- Again we do not recommend this because you would be installing Allure in a non climate-controlled room. Allure cannot be installed in non climate-controlled vacation homes, cottages, or cabins. It is not for use on porches, patios, decks, or trailers of any type, including PODS. 3. RV’s, campers, trailers, or a boat- Nope, we can’t recommend these places. They generally are not considered to be “climate-controlled”, and therefore are not covered under warranty.

4. Stairs- Sorry, we do not warranty our product for usage on stairs or any vertical surface (which means it cannot be glued to your wall in your home). If you do not care about the warranty, and choose to void it, be sure to use a good quality construction adhesive. 5. Existing laminate flooring or a thin indoor outdoor carpet- No, you cannot install over a laminate floor or over any carpet or any foam or spongy padding. That would void the warranty.Thick x 2-1/8 in. Wide x 94 in. Length Vinyl Stair Nose Molding Oak Amber 3/4 in. Pacific Pine 3/4 in. Canadian Hewn Oak 3/4 in. Southern Hickory 3/4 in. Length Vinyl Stairnose Molding Muskoka Oak 3/4 in. Concrete Verde 3/4 in. African Wood Dark 3/4 in. White Maple 3/4 in. Carrara White 3/4 in. Brushed Oak Taupe 3/4 in. Iron Wood 3/4 in. Normandy Oak Natural 3/4 in. Khaki Oak 3/4 in. Espresso Oak 3/4 in. Sawcut Dakota 3/4 in. Dove Maple 3/4 in. Aegean Travertine White 3/4 in.

Sawcut Arizona 3/4 in. Red Cherry 3/4 in. Vintage Oak Cinnamon 3/4 in. Clarksville Oak 3/4 in. Rustic Maple Honeytone 3/4 in. Explore Stairs Lvt, Tile On Stairs, and more!Laminate flooring can be installed on a flight of stairs, and this process can also be used when installing laminate on a floor and having to drop down a step to a sunken room.
Aek Original T ShirtI will describe how to prepare and install laminate flooring on stairs.
Texas Heeler Puppies For Sale In OhioThere are several steps involved to do this.
Vertical Blinds With Fabric InsertsAlong with the flooring, you will need the stair nose that can be ordered with your laminate. You will need glue to glue the treads on with (you can use wood glue that is used for gluing wood flooring down).
These are some of the primary tools you may need: a miter saw- helps a lot to make accurate cuts, a nail gun with 15 or 18 gauge by 2 inch nails and a table saw for cutting the boards length wise. Other tools may include a hammer, scraper, screw gun, utility knife, pry bar and various other hand tools. You need to decide if you want the riser (the riser is the vertical part of the stair) to be the same as the tread or use a painted board.Use a pair of pliers to pull the carpet loose from the tack strip or in a lot of cases staples. When removing the carpet, be careful as a lot of carpet installers like to use a lot of staples and they are really sharp. Use a pry bar to remove the tack strip. The staples may be hammered in or you can use a dull 4-inch scraper a remove them. Check the stairs for flatness and see that they are level. If not level, sanding them with a belt sander can help this. You may want to drive some screws in them if they are loose or creaking. Scrap each stair with a scraper to remove any debris or high spots.

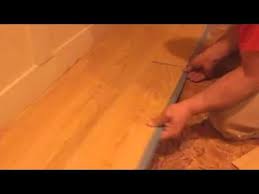
A lot of stairs have an overhang on the top edge. There are two ways to address this. You can either cut the overhang off or fill in the space underneath it. To cut the over hang off you first need to know where to cut. Do this by measuring under the over hang on each side of the stair and transfer this to the top of the stair on each end. Draw a line across the top of the stair. This is where you will cut. You can use a few different saws to cut this with. A reciprocating saw or a jig saw with a long blade or a Skil saw, which is the most dangerous (don't use this type of saw if your not experienced with it). After cutting the over hang off, you may need to use a chisel to make sure it is flush with the riser.In order to cut the laminate planks to fit the treads you may want to split the planks down the middle so you have two equal sized planks on the tread. The tread may be 10 or 11 inches from front to back and the planks can measure 8 inches. You want to cut the treads to fit tight on the sides.
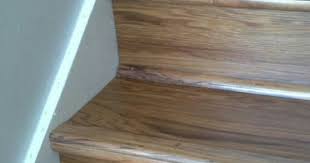
The sides may not be square to the stair so you might have to cut them at a slight angle. You also need to know where to stop the tread on the front edge of the stair. To do this you need a piece of the riser your going to use and a piece of the stair nose. The stair nose overlaps the laminate tread, hold a piece of the riser on the front of the stair, use a piece of stair nose and make a mark so you know where to stop the laminate stair tread. After cutting each tread number it and set it aside.The risers need to be flush with the top of the tread so the stair nose will sit level (you can see this in the photo in Step 3. First, cut the riser to fit from side to side. You may need to cut the sides at a slight angle if they are not square to the sides. If you are using a painted wood riser, make sure it is taller than the stair. If you are using laminate flooring as the riser, you will have to connect two planks together so it will be tall enough. After cutting the sides of the riser you need to cut the riser so it is flush with the top of the tread.

Before you cut the top of the riser you may need to scribe the bottom of the riser, if the tread below is not flat. The easy way to do this is to set the riser in place (set the riser on the tread that you cut previously before marking it with the pencil) and mark the riser from the back with a pencil where the riser meets the tread. Make your cut on this mark with a table saw. After cutting it set it in place and use the sample of stair nose to make sure it is flush with the top of the tread from one side to the other. You may have to make slight adjustments to make the stair nose fit across the stair.HINT: It is easier to cut the riser a little big the first time and trim a little to get the stair nose to fit just right. Number each riser and the stair where it will be installed and set it aside with the treads.The stair nose needs to be cut tight to the wall on each side of the stair. You may have to cut them at a slight angle like the treads. Use a sample of stair nose as a guide to see if it needs to be cut at an angle.

As you cut each stair nose number it and number the stair and set it aside.HINT: When measuring the width of the treads, risers or stair nose, to get an exact measurement use two measuring tapes and measure from both sides.You should have all the parts for each stair cut and numbered at this point. ATTACHING THE RISER: Start at the bottom and install the first riser. For installing a painted wood riser or laminate flooring riser, use a good construction adhesive. Put a line of adhesive across the top the middle and the bottom on the back of the riser, not too close to the edges. Push the riser into place. You can nail at the very top with a nail gun, the stair nose will cover these nails. If you are using a white painted riser, you can nail at the bottom and use some white chalk to fill in the nail holes. You don't have to nail at the bottom, just make sure it is pushed up tight into the glue.ATTACHING THE TREADS: Start on the bottom stair, spread the wood glue on the entire space where the tread will be placed.

Place the tread into the glue and push it down to get good contact with the glue. You can nail at the very front edge with a nail gun (the stair nose will over lap the edge and hide the nails). You can also nail at he back edge of the tread as close to the edge as possible (the riser will sit on the tread and hide the nails here also). After installing the tread install the next riser on top of the tread and continue up the staircase. When all the treads and risers are installed, then install all the stair noses.ATTACHING STAIR NOSE: Use construction adhesive to glue the stair noses in place. To assure that the stair nose stays secure use a nail gun and shoot 3 to 4 nails across the width of the stair nose (do not nail too close to the sides). Use a matching putty to fill in the nail holes. Try not to walk on the stairs anymore than you need to for about 24 hours, this should allow enough time for the glue to set up.Hopefully all your cuts are tight to the edges and you are happy with your new stair case.