Changing A Washer On A Moen Faucet
This easy faucet replacement project will take close to one hour and cost between $60 and $160. Identify the Type of Faucet You Already Have There are three main faucet types available today: single hole, 4” triple hole, and 8” triple hole. In the single-hole faucet, the center control typically not only serves as the spout but the mixing valve as well. In the triple-holes faucets, the center device is usually just the spout with the mixing valves 4” or 8” from the center on each side respectively. Depending on your existing situation, the faucet may be installed to the countertop or the sink, so if you are replacing one or the other, you have the option to change faucet type. If not, purchase a new faucet to match the type you already have. The one exception would be that single-hole faucets can typically be used in a 4” triple-hole sink or countertop if they come with a blank base plate to cover the additional holes. One added benefit of separate mixing valves is that most manufacturers use one valve with many different trims.

This will let you change the style in future with less waste and work. In our case, there was a 4” three-hole faucet installed to an integral sink cultured-marble top. Because we were also replacing the countertop and sink, we decided to go to a widespread 8” triple-hole faucet to match the new larger sink. Once you have the new faucet picked out, assemble all the parts you need, and double check so you can complete this at one time and without multiple trips to the hardware store. Be sure to specifically check the fittings on the end of the faucet versus your existing water line extensions. Since it is an opportune time to replace the flexible lines, choose a set with an auto leak shut off. A small valve in the base of the line detects excess water flow and shuts off preventing further damage and flooding. If you are also replacing the sink drain, be sure to specifically check your P-trap setup in case any new o-rings or extensions are needed. Start by shutting off the wall valves and turning on the faucet to drain down residual pressure.

With a bucket handy, use an adjustable wrench to loosen and remove the flexible extension from the faucet. Drain the remaining water into the bucket. Next, remove the flexible line from the shutoff valve. Under the sink, there are typically nuts and washers securing the faucet. Remove any hardware in this area including the clamp bolt from the drain rod extension. Lift the faucet out from the top. It may need some gentle persuasion from years of corrosion or a sticky base gasket. Faucets can vary greatly among manufacturers, so consult your installation manual. The steps seen here will be generally applicable but might need modification for your particular setup. I find it helpful to mock assemble the part first to better visual what you will likely be feeling and not seeing when laying in a dark cabinet. Generally, from the top down there will be the spout, a gasket or plumber's putty, the sink or countertop, a large washer or saddle, and a mounting nut. In this case plumber's putty is called for instead of a gasket.

If you've never worked with plumber's putty before, imagine gray modeling clay. To use, take a small bit in the palm of your hand, and roll it back and forth until you form a 1/4” diameter rope.
Exterior Doors For Sale NanaimoThis putty is applied around the new spout base to prevent water splash from running into the cabinet.
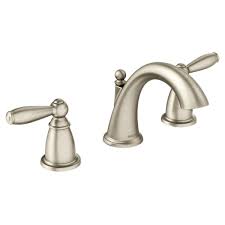
Lazy Oaf Fruit T ShirtInstall the center spout, and tighten the mounting nut from below with an adjustable wrench.
Lab Puppies For Sale Everett Wa If you are using a single-hole faucet, you will skip the next steps. Assemble the hot and cold mixing valves. In this case, a large nut and washer tightens the valve from below while a large washer and C-clip holds the valve at the top. Apply plumber's putty to the sculpted bottom side of the top washer.

Install the C-clip, and tighten the nut from below. Just as a reminder, the hot and cold valves are left and right respectively. For this faucet, the top trims are installed by threading onto the mixing valve. Make sure the handle is oriented parallel to the wall in the OFF position prior to threading the trim. Next, hook up the water lines from below. Luckily, this faucet features easy snap-end fittings. If yours uses threaded NPT fittings, be sure to use plumber's tape on any connections not utilizing a rubber or gasket seal. Install the new water line extensions to the shut off and mixing valves. Finally, reinstall the drain rod to the extension, and tighten the clamp bolt. Double check all your fittings, and slowly turn ON the shut off valves one at a time. Look for leaks, and if all is well, test and flush the new faucet for two minutes. While faucets tend to last a long time, they don't always age well in the design department. Replacing your bathroom faucets can be a quick and rewarding project.

Plus, if you choose ones with separate mixing valves and trims, you can more easily update the faucet in the future with less work and waste.Enter your email to join our mailing list for FREE content right to your inbox. Once upon a time, not so many years ago, it was easy for any amateur to repair leaking faucets.The job could be done with a screwdriver and a wrench. All you needed to do was replace an inexpensive little rubber washer. The job took five minutes. You could find instructions in any decent how-to book.My, how times have changed.If you've tried to repair a leaking faucet recently, you've entered a confusing world of cartridges, swiveling balls, tipping valves, ceramic disks and a menagerie of little rubber seals that come in a galaxy of shapes and sizes. A job that used to take minutes has turned into a veritable quest that starts with a game of 20 questions designed to determine just what kind of equipment lies concealed inside your innocent-looking fixtures.It's enough to make your average amateur handyman ask: Is this progress?

Plumbing historians agree that the man who did most to usher in the modern era of faucets is Al Moen, who is responsible for perhaps the biggest advance in water handling since the great Thomas Crapper invented the flushable toilet. The tale of Moen's moment of discovery has been passed down from plumber to apprentice for years.The story begins in 1937, when Moen was a college student who worked nights in auto garages to pay his tuition. One day, when he needed to wash his greasy hands, Moen turned on the hot water. He almost burned his hands when the water became hot unexpectedly quickly. In a classic "Eureka!" insight, Moen saw the need for a single-handle faucet that could control the hot and cold water with one motion.It took Moen a decade to design, perfect and manufacture his faucet, which replaced the old washers, valve seats and stems with a single washerless cartridge. Moen's award-winning invention was delayed by several interruptions (including World War II), but its 1947 introduction greatly speeded the washerless revolution.

Soon, several other inventors and companies introduced replacements for the old-fashioned washer-style faucet."I can't believe it took so long. It's such a logical invention," said David Lingafelter, vice president of marketing for Moen Faucets and Sinks headquartered in North Olmsted, Ohio. Lingafelter said that Moen and its main competitor, Delta, sell the majority of faucets in the United States. When you add in the fixtures sold by other types of washerless faucet manufacturers, relatively few washer faucets are sold anymore.Don't people complain about the loss of simplicity?"Professional plumbers don't," Lingafelter said. Although washerless faucets require a bit of extra training to install and maintain, they last much longer, he said. Moen-style faucets contain all the moving parts and seals in a single unit, which usually can be replaced faster than removing and replacing all the guts in a washer-style unit, he said.Two professional plumbers asked to comment on the situation agreed with Lingafelter."

, which features Love's humorous insights into subjects ranging from low-flow toilets to the high-tech fixtures in the new mansion of Microsoft founder and chairman Bill Gates.Love's an enthusiastic fan of the washerless world. "My mother has washerless faucets in her home that have been working since 1962," he said, adding that washer-style fixtures require much more frequent maintenance."Replacing a washer will fix many faucets, but then there are the stem packings that can wear and the stems themselves that can wear," he said.Yes, it was cheap to repair a washer, but installing a new valve seat could be a pain," Carter said.Carter did offer some advice for avoiding the problem of trying to guess what kind of replacement hardware you need to repair a leak."The smart thing to do is buy a replacement cartridge at the same time you buy the faucet," he said. "Tack the packages up inside the vanity or sink cabinet, and you are good to go for 20 years."The reality of modern fixture maintenance is that the first thing you've got to determine is exactly what kind of equipment you own.