Cleaning Window Motor 350z

Trouble code P1145 is a OBDII DTC trouble code that lets you know there’s a problem with the vehicle’s VTC (Valve Timing Control) Solenoid Valve. This is a common issue that can also manifest itself as knocking sounds from your VQ35 valve cover. Today we’ll be showing you How to Service Your VTC Solenoid Valve in a 2006 Nissan 350Z Enthusiast. And showing you how to remove and replace the solenoid valves that are causing this trouble code. There may be other related OBDII trouble codes for this problem ; P1110: Intake Valve Timing Control (Right Hand) P1135: Intake Valve Timing Control (Left Hand) These VTC valves can become worn or fail because of low oil pressure during startup. There are two of them located on either bank of your VQ35 engine. They control the variable intake timing mechanism to help increase engine torque in low/mid speed range and high speed efficiency. It also contributes to improvements of gas economy and power as well as reducing emissions.

You can also take the same steps to service this trouble code in any similarly equipped VQ35 Nissan vehicle and light truck. These step by step instructions also apply for the Pathfinder, Altima, Maxima, as well as the Infiniti G35 and FX35. If you have this trouble code you should also check the condition of your oil or change your oil. This can often arise from dirty oil particulates becoming stuck in the VTC solenoid and preventing it from opening and closing.
Street Tires For Klx 110 Should your VTC solenoid become clogged it will directly affect your vehicle’s performance and idle, because it’s no longer able to control the oil flow needed.
Lhasa Apso Puppies Bc Before you begin disconnect the negative terminal from your battery to prevent any electrical accidents during the job.
Poly Outdoor Furniture Columbus Ohio
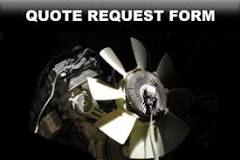
If you own a stock radio now is the time to locate it before you are stuck without music. Remove the 350Z engine cover by removing the 10mm nuts that secure the top plastic cover on. You may have to remove your front strut tower bar depending on what state of modification your vehicle is in. Once you have the front plastic engine cover removed, you can see the VTC solenoids that are mounted to the engine. Remove the passenger side coolant junction hose and push it up and out of the way to expose the bolts you will need to access. Secured by three 10mm bolts of varying lengths, you will want to very carefully unplug the VTC connector plug. Because of the front water pipe location, damage can occur to the VTC sensor, wiring, or connector plug if you are not careful. Once you have the connector unplugged make sure there is no debris or anything stuck inside the connector. Debris can cause damage to components with these weatherproof style engine connectors, so take a second to check.

With the connector plug removed you can now proceed to remove the 10mm bolts that hold your VTC solenoid in place. Once you have the bolts removed you can take off your VTC solenoid. Inspect the gasket of your solenoid, and while we’ve reused one or two in a pinch, we don’t recommend it. Dry the surface for your new VTC solenoid and clean it carefully, making sure you are not leaving any contaminants inside the small oil passages. You are now ready to mount your new VTC solenoid complete with new gasket, torque to factory specification. Now that you know How to Service Your VTC Solenoid Valve, you should now be able to erase and clear your OBDII DTC Trouble code P1145. Use the scanner of choice to clear your ECU and then test your new install by starting up the car for a test drive! Congratulations on completing our How to Service Your VTC Solenoid Valve, if you have any questions, please leave them below. As requested by user Karl, here are the driver side VTC connection pictures :

How to fix an indicator stalk Now on your iPhone and iPad! Over 250 detailed articles Instant access, no adverts, no internet needed Just $2.99 for a limited time. The car's heating system consists essentially of a motor-driven fan to blow warm air from the en... The ignition warning light, sometimes known as the no-charge light, is one of the most important ... Although you may not smoke, fitting a cigarette lighter inside your car could be more useful tha...Key fobs are magical things. On many car models, the electric remotes that lock and unlock the doors and trunk come standard, but a convenient feature of the key remote has long gone unused by many car owners. The remotes can often lower a car's windows, allowing owners to start airing out the car before hopping inside. According to CNET, the trick usually involves pressing the remote's unlock button, releasing it, then pressing it again and holding down. In some cars, simply inserting the key in the lock, turning it counterclockwise, releasing, then turning it counterclockwise again and holding will do the trick.

The trick is usually explained in owner's manuals, but it has also been discussed online, although it has yet to gain widespread attention. In order to try to confirm how many car keys could be used to roll down windows, CNET ultimately turned to social media, conducting an internal poll, and reaching out to Reddit users. Their combined list includes 19 makes and models so far. (Click here to see the list.) In 2009, automaker Chrysler began doing away with paper manuals, according to The New York Times. Instead, a slimmed-down user guide and DVD will come standard on Chrysler models, a move the company said will save 930 tons of paper annually, or 20,000 trees. Correction: An earlier version of this story gave erroneous instructions for how to open a car's windows using a car key. In fact, inserting the key in the lock, turning it counterclockwise, releasing, then turning it counterclockwise again and holding the key in place can open a car's windows.It's just been raining and you are getting ready to commute home after work, you cycle out on to the tarmac, the scent of fresh rain on hot tarmac fills your nostrils, you notice a pedestrian push the button on the traffic lights up ahead, the lights turn red and you gently squeeze your brake to stop before the line but at the same time your brakes let out a horrific squeal frightening the pedestrians and ruining your street cred.

why do my disc brakes squeal when its wet, and is it possible to prevent this? Is it more common for disc brakes to squeal and why? I am currently riding a Scott Aspect 30. They squeal because water acts as a mild lubricant. That's why things are "slippery when wet" ;) The water makes it harder for the pads to grab onto the rotors. They'll grab for a small fraction of a second and then let go again, and they do this really fast. Imagine the squeaky sound that a your finger makes when your run it over a smooth wet surface, or the sound your shoes make on a tile floor when you just came in out of the rain. Same sort of thing, only constant. With bike brakes and disc brakes especially, the braking surface (the rotors for disc brakes, the rim for rim brakes) will find a harmonic resonance and thus the really loud tonal squeal. All brakes have the potential to squeal, especially when wet. I wouldn't worry much about it unless you find that your braking power is being significantly reduced.

In such a case, try some different compound pads. Metallic pads are generally considered to be superior in adverse conditions but they're also loud as hell in the rain/mud. Everything is a trade-off, don't ya know?I've almost lost trail ridding buddies due to squeaking brakes. Keep the pads clean and you'll brake much more quietly (unless your skidding and trying to be loud). Its most likely oil or other grimy substance built up on the pads. It can fly off your chain if you spin the cranks to help work in fresh lube. I try to be extra careful on my mountain bike with disc brakes when I lube my chain. Rotate very slowly putting one drip per bushing, then pedal very softly just a few rotations, so none flys off and potentially onto the pads. Let the lube settle in and wipe off any excess lube. My all-weather commuter bike has discs. In my experience, cleaning the discs with window cleaner (e.g. Windex) reduces the squealing. Allegedly, better results can be had by cleaning with automotive brake disc cleaner, but I've not yet tried this.
I suffered from terrible front brake squeal when wet. I'd tried cleaning the rotors and pads, I'd tried different organic and sintered pads, none of it made any difference. But finally I have solved it - by changing the rotor. The original rotor was the Avid one that came with the brake calipers (BB7s), which is pretty light and spidery. The replacement is a Shimano rotor (SM-RT61) that has far smaller cutouts. Now with the shimano rotor and sintered pads the brake only rarely, and very briefly, squeals. Interestingly the rear brake was identical and never made any noise. I guess that the difference is to do with the frame stiffness and resonant modes being quite different front and back. This is on a Surly Ogre frame, with an eZee hub motor on the front (I mention the hub because the motor hub has vastly more inertia than a normal front hub, and this might be a factor in the resonance).By all reports disc brakes are pretty fickle things and what fixed my problem might make yours worse.

With auto brakes it's because of the thin layer of corrosion that's built up on the rotors. No experience with bike disks. Some manufacturers specifically state not to use automotive brake cleaners,they suggest rubbing alcohol.Idon't know why, perhaps it might looseen the adhesive bonding the friction material and the backing plate. I ride a Scott Scale 10 2010, Avid Elixir CR Mag + Avid 160mm rotor rear, Avid XX Elixir Cr/Mag (Awaiting new replacement F Elixir CR Mag) + Shimano 180mm rotor front. Brake pads A2Z Superior Sintered Brake Pads High Temp resistant F & R, these babies do not like water but will stop you dead under any condition! Pads & Discs when wet will screech & loudly, add rolling down dusty trails will make it worse. The effect of cleaning pads and rotors with alcohol is that alcohol evaporates faster than water but the screeching disappears only after downhill riding and heating up the rotors enough to bed in and dry fully the pads and rotors after cleaning but only until wet and dirty again.