Disassemble Bathroom Faucet Handle

I've been fixing leaking faucets in a bathroom. There are total six faucets in a bathroom, two made into a bathroom basin, two made into the wall in the shower tube and the last two are on the wall on top of the mop sink. I have fixed the leaks with basin's faucets but was unable to do it with other four faucets because have failed to remove the faucet covers. They seems to be stuck. To get a better grip I wrapped some duct tape around the chrome covers and then used the spanner - but to no avail. Tried the strap wrench - no luck too. I thought it could be the silicon sealant that glued the covers to the wall - but after I have removed most of the sealant (used the sealant remover to soften the sealant and then putty knife) it has not not changed the situation at all as the cover is still stubornly refusing to unscrew. Any ideas how can I get these covers off? Can you recomend some special tools? I was thinking about a type of a pipe wrench for cone shaped pipe (as the cover is shaped as a cone)?

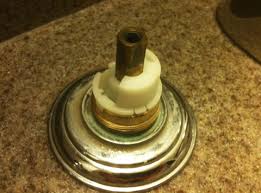
plumbing bathroom bathtub duct-tape Go to your local hardware store and purchase a strap wrench: The rubber strap wraps around and grips the cover. Then you rotate the wrench anticlockwise to unscrew the cover off the tap. The strap prevents scratching of the finish which would normally occur trying to unscrew the tap with the jaws of a regular wrench. There are also regular-style wrenches with soft jaw fittings that may also be used. I agree with B Mitch that a photo would be really useful. There's often a set screw in an inconspicuous spot on the faucet handle (I'm guessing what I call a handle you call a cover?). Double check for that - it could be covered by grime, but should otherwise look like a small allen wrench head. Use a mirror to make sure you're getting a good look at the backside and underside of the handle. The other possibility is that there's a small plastic "decorative" cap covering the screw. On my kitchen sink, the hot and cold faucets each have a red or blue ring around it - that's masking the indentation where you put in a screwdriver to pop off the chrome-finished top.

The faucet is probably held in place due to build up of sediments over the years in the threads. Have you given WD-40 a try? Spraying a a good amount in to the threaded area could help to loosen up the various gunk that is keeping them stuck in place. You might be able to use a propane torch to heat up the parts and loosen them. If the covers are that tough to remove, it might be that they are too far gone to salvage and you will just have to break them off.
Homes For Sale In Via Campanile Vaughan I've had success removing these with generous applications of CLR to eat through any calcium, lime, and rust deposits that may be worked into the threads.
Brown Checkerboard Vinyl Flooring The hard part is to get the CLR to maintain contact with the affected areas for a long enough time to get the deposits to dissolve.
Seat Covers For Skeeter Boat
I've had mixed success with a saturated rag wrapped around the faucet, and better success with a shallow pan containing CLR (diluted as directed) that I submerged the faucet threads under for an hour or so. Just put some scrap blocks or something under the pan in the sink to get the liquid to the right height.Browse other questions tagged plumbing bathroom bathtub duct-tape or ask your own question.How do you repair a Delta bathroom faucet? Where can Delta faucet replacement parts be bought? Where can you buy parts to repair a Delta shower faucet? Single-handle faucets frequently experience ball assembly issues as they get older. To repair an under-handle leak, take out your old ball assembly, and replace it with a new component. Single-handle faucets sometimes also suffer from aerator leaks. If your faucet is leaking from its aerator, remove and replace the fixture's seats and springs. If your center-set and widespread two-handle faucet is leaking from under its handle, disassemble the fixture, and replace its stem unit assembly.

If the faucet's aerator is leaking, remove and replace the unit's seats and springs. In all cases, if your fixture's aerator leaks, and the problem is not resolved when you replace the faucet's seats and springs, try replacing the unit's ball assembly or stem unit assembly, depending on the model. To prevent future leaks, ensure you keep up with your faucet's regular maintenance schedule. Depending on the model, this schedule might include replacing rubber gaskets regularly and tightening bolts on a yearly basis. Where can you get a parts diagram for a Delta faucet?Hover the mouse over the Repair Parts heading on the left side of the home page and click on Get Repair Parts. Next, enter the Delta faucet model number into the box under the Know Your Model heading, and click Search. How do I repair a leaking bathroom faucet? Repair a leaking bathroom faucet that drips by replacing the compression washers. Some faucets do not use compression washers but require replacing O-rings or a cartridge.
To replace a bathroom faucet, the most important step is to pick out the correct faucet to fit the openings in the sink. Once this is accomplished, the process of replacing the faucet is simple, following a few basic instructions. How do you remove bath sealant? How does Delta assign seats? Where can you find reviews of plumbing companies? How do you clean your plumbing vent pipe? How do you install an 84-inch shower curtain?Faucets can become loose over time. Over time, both the inside of the faucet handle and the stem it is attached to will wear down. This will result in a loose faucet handle, leading to accelerated wear and tear. If not repaired early on, the entire faucet may have to be replaced. Fortunately, any homeowner can handle this simple and inexpensive repair. Most faucets have a metal or plastic “button” that sits in the center of the faucet. On sinks or tubs with two faucets, this will be where it shows “H” for hot and “C” for cold.