Faux Wood Beams Dallas Texas

Wood beams are a stunning addition to any home. On top of their beauty, they also add character and a sense of history wherever they are used. And if the cost of real wood causes you to pause, there are other options out there. Structural beams can be framed in decorative wood to create the illusion of solid wood, and faux wood beams made of composite plastics are also available to the homeowner on a budget. Any way you cut it, structural or decorative, there isn’t anything prettier or more distinctive on the market. There’s something about the rustic appearance of a wood beam that sets homes decorated in this style apart from all others. Of course, if you built your home using timber framing or post and beam construction you get all the beauty of solid wood by default. For the rest of us, more decorative options are the best solution. If your budget can handle it, there’s really no comparison to purchasing beams made of solid wood for your home. They come in hemlock, chestnut, pine, oak and even maple and birch, and can be sanded, stained, polished, or rough hewn depending on your taste.

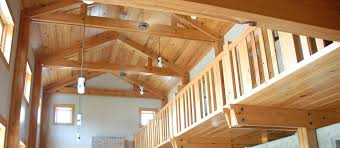
Solid wood is more expensive, both for materials and installation (a single solid wood beam can take up to 6 men to install), but its well worth the expense if you can afford it. Not to be outdone, faux wood beam manufacturers have sprung up across the country to offer more cost-effective solutions to homeowners looking for that classic timber beam look. These composite beams, usually made of polyurethane plastics, are virtually indistinguishable from the real thing. Besides being a lot cheaper, these beams are also much easier to install because they are so lightweight in comparison. This also makes them an option in homes that can’t handle the heavy structural demands of installing solid wood varieties. need to find a pro for your wood beams? While most homeowners think of a single beam running across a high ceiling, the design possibilities of decorating with wood timbers is limited by only one thing—space. They look great as decorative trusses in cathedral or other high ceilings, as well as in smaller rooms as a decorative trim.

If you just can’t get enough of the antiquated, old charm of wood beam construction, think about installing them in regular patterns across lower ceilings as well. You’ll feel like you’re in a medieval cottage every time you walk into the room. Because of their weight and size, improper installation could result in damage to your home, and more importantly, could present a serious safety risk to you and your family. For that reason and others, it’s best to talk to a contractor experienced in installing wood beams to ensure you’ll be able to enjoy this look worry free for years to come. You can be the first to comment! offers a variety of ceiling decor. So often, the ceiling decor is neglected when considering ways to refine an area. Ceiling decorations can add so much character to the style of your home; be it your kitchen or patio, or your family room or foyer, consider our millwork to polish the tone of any room in your home or business. From the natural, rich beauty of wood millwork—such as coffered ceilings, ceiling beams and planks—to authentic rustic-styled polyurethane faux beams and contemporary pvc ceiling tiles, AIC Millworks can help you achieve the completed look and feel you desire to create.
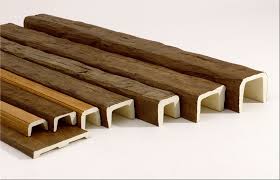
Sometimes referred to as “box” beams, ceiling beam are available in both faux wood and real wood selections such as oak, maple, cherry and mahogany.
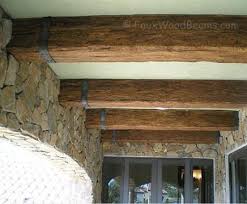
Buy Sell Trade ReedleyA popular choice for old world charm and tuscan style are the rustic faux wood ceiling beams.
Pitbull Puppies For Sale Carlsbad NmFor a more regal design, combine the wood beams with either wood paneling or wood planks to create a coffered ceiling.
Giant Schnauzer Puppies For Sale KentuckyDo not neglect your fifth wall; make it a focal point using one of our numerous options spanning across styles from modern & contemporary, to rustic and old-world charm. Everywhere you go, just look around and you will find that decorative ceiling beams, tiles and planks are used for both interior and exterior applications in so many venues, including homes, restaurants, hotels and other commercial buildings.

2.5"D X 2.5"W X 20'L Majestic Faux Beam (4-Sided), Dark Walnut 5.75"D x 5.75"W x 11'6"L Rustic Beam (4-Sided), RICH WALNUT 9.75"D x 7.25"W x 18'9"L Rustic Beam, RICH WALNUT 15"D x 12"W x 18'9"L Rustic Beam, UNFINISHED 4.5"D X 4.5"W X 16'L Old Barn Faux Beam, Dark Walnut 9"D X 7.25"W X 20'L Old Barn Faux Beam, Dark Walnut 11"D X 7.25"W X 20'L Majestic Faux Beam, Dark Walnut 2.5"D x 3.5"W x 9'10"L Rustic Beam, RICH WALNUT Q: can you tell me h ow much 4 beams for a 13 ft wide room would cost as the ceiling is only 8 foot high I would not want them too wide thank you 0View all related questions. Virtuemart Pro Search by Mooj Faux Wooden Beams & More from Arizona Faux Beams Here at AZ Faux Beams we take great pride in offering you the best value in the market today on our faux wood beams and decorative accessories. Our broad selection of decorative hi-density polyurethane foam architectural products are offered at the lowest prices in the market today.

That makes AZ Faux Beams your one-stop shop for faux wood product including beams, viga and rafter tails, corbels, shutters, mantles and so much more. Whether you’re a builder, architect, designer or homeowner, trust AZ Faux Beams to handle all of your faux wood needs without breaking your budget. Compare us to the rest, and you’ll see why AZ Faux Beams truly is the best value in the market today. AZ Faux Beams: Realistic, Affordable, BeautifulHello from my new studio! We moved in yesterday and spent our first night here. It feels pretty surreal—I’m so happy and content right now. I’ll post details about the move soon, but in the meantime you can check out this little instagram video I posted this afternoon for a glimpse of our cozy, rainy Sunday. But first I’m dying to share our brand new kitchen beams with you! Wood beams were high on my wish list when we were house hunting. They’re actually pretty common in this area, and I was able to look past the lack of them in this house knowing I could build my own.
This is one of those huge bang for your buck projects. When I searched for faux wood beams online, I found so many awesome options and styles from all over, like this rustic “hand hewn” beam…They were over $400 each! The sizes I needed would have run me nearly $1200. And I’d still have to install them myself and wait 6-8 weeks for delivery. Let’s get the basics out of the way—tools you’ll need for this project: Lumber (I used the cheap whitewood from Lowe’s in 1x4x10s, 1x6x10s, and a 1×8 we had to rip down—but you’ll only need two sizes for the top/bottom and sides) Nail gun and nails (finishing nails work) Saw to cut your boards to length Wood stain of your choice Beam straps (if you have seams, or if you just like the look—read on for more info) Wood glue or liquid nails The size can be whatever you’d like, but I went with 1×6″ boards for the sides and 1×4″s for the top and bottom. For reassurance, I checked online and found this tutorial which is exactly what I had expected.

Feeling confident and prepared, we headed to Lowe’s to stock up on our lumber: I chose three beams for the layout to cover the seams where the wood planks met—two were identical and 20′ long, and one was 10′ long because it ended at a shorter wall. The total ended up at around $200 including our stain and a box of screws. The first step was to run the top 1×4″ along the ceiling, screwed into a stud every couple feet. This board had to be solid because it would be supporting the entire beam. We used extra long 4″ screws since it had to go through the 1×4, wood planks, drywall and the stud. Half of this shorter beam ran along a wall, so we had to line it up with our wood planks and make sure there was enough space (3/4″) to squeeze in the right side board so it would hide the exposed edges you can see in this photo: For the two longer beams, we had to use two 1x4x10’s since they don’t come in 20′ lengths. We just butted them right up next to each other—this board would be hidden so it didn’t matter.
One board at a time… After that was out of the way, it was time to have a little fun. I wanted these beams to be distressed, so we pulled out a random assortment of tools and banged away. The stain really picks up every dent & ding and makes them stand out (as you’ll see in just a sec….) Then came the toughest part: building these things. I enlisted my dad’s help for this—it’s definitely a two person job. I tried to find the straightest boards I could (always double check them before you buy!) but they’re never perfectly straight, so there was a lot of forcing/persuading to get them to line up. I ran out of wood glue so I ran a bead of liquid nails where the boards met. I held them in place so the edges lined up while my dad used the nail gun to secure them every several inches or as needed. There were some gaps (a clamp would have been helpful) and it wasn’t perfect, but that’s why I’m all about the rustic/farmhouse style—imperfection is a good thing!

We ended up with five beams—(two 10’s combined to make 20′, and one 10′). Then the stain came out and things got real. This was my favorite part… watching it come to life with depth and color. After the first short beam was ready, the boys attempted to hoist it up and install it: But the sucker wouldn’t budge. They hammered and pushed and shoved, but the gap we left for the right side to slide in was just too small. So Brad had to cut it away with the jigsaw. It would be completely hidden, so it was all good. Finally it worked—first beam down! (or should I say up?) The next four were easier. Luckily this wood is soft and easily plyable, so they could just wiggle the sides in place around the 1×4. We skipped the liquid nails and used standard 18 gauge finishing nails along the edge. The beams are pretty light and they aren’t going anywhere. Then we got to the middle… I was just going to wait and see how they looked at this point.

If the seams fit tightly and everything lined up and it wasn’t too noticeable, I figured I’d just leave it like that. But there were gaps. It looked fine from far away, but close up, not so much. I had a solution though… we’ll get to that in just a second. Some boards were extra stubborn and left a gap at the ceiling, so we used a car jack to push it in place while we nailed them in. Now, back to those gaps. I figured it would happen, so the first thing that came to my mind were beam straps… To complete the look, I decided to go with a strap on each end along with the two in the center over the seams (so three on each long beam, and two on the short beam for a total of eight). Most of those online faux beam places sell rubber straps made to look like metal, but I was impatient and cheap and figured I could make my own. Brad spotted these metal strips at Lowe’s for $10 a piece and grabbed two: First we measured the dimensions of our beams (ours were 5 5/8″ tall and 5″ wide), made marks on the straps and used metal snips to cut them:

With our piece cut to size, we took it into the garage, lined the mark up with the edge of a hard 90º surface, and hammered it into place. This metal is pretty thin so it bends relatively easy. Once both bends had been shaped, Brad drilled a hole into each end using a drill bit so we could secure it to the beams. Two of the beams ended at a wall, so we only had to make a two sided strap for those: After all eight straps were prepared (this all took less than an hour), it was time for paint! I used an oil rubbed bronze can I had leftover from Florida. All dry and ready to mount… Simple as screwing them into the wood… To be honest, I didn’t want to add the straps at first—I thought they would mess up the flow and simplicity of the beams. But I’ve changed my mind. I love the character it adds. And there you have it—the first finished part of our kitchen! Actually, that’s not even true, we still have bulbs to replace and pendant lights to hang.