How To Install Cast Iron Tub Alcove

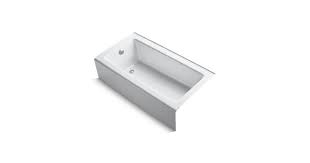
An apron bathtub can be made of cast iron, acrylic or fiberglass. Cast-iron bathtubs offer durability and efficient use of space in a bathroom. A built-in apron runs across the front of these basic tubs, while you surround the tub on the other three sides by alcove walls. The installation of apron-style tubs involves less work and materials than an island-style bathtub. Follow the manufacturer’s provided dimensions to rough in alcove wall studs with 2-by-4 lumber to ready the area for the bathtub installation. Connect a combined bathtub-shower valve to the cold and hot water supply lines in the “wet” wall of the alcove, sweating the valve to copper pipes or applying CPVC glue and primer to the junction of the valve and CPVC pipes. Hold the valve in place with pipe straps on a 2-by-6 crosspiece between the wet-wall studs. Run a shower pipe up to the showerhead’s drop-ear elbow, also held in place with pipe straps, on a showerhead-level 2-by-6 crosspiece. Connect the drain and overflow pipe to the bathtub following the pipe manufacturer’s instructions.

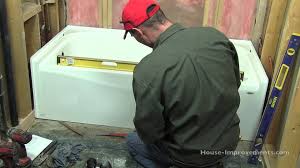
These will likely direct you to place plumber’s putty around the drain outlet and a gasket around the overflow pipe before hand-tightening the couplings. Move the cast-iron bathtub, with the help of an assistant, into the alcove. Test that the bathtub is level with a spirit level and shim it with metal shims if necessary. Tighten the coupling connecting the bath drain assembly to the drainpipe. Cut water-resistant drywall or cement backer board long enough so that it can overlap a built-in flange, if present, on the three non-apron sides of the bathtub. If no flange is present, cut the material long enough to reach the tub surface. Screw the drywall or board to the wall studs. Place a tube of silicon sealant in a caulking gun and apply the sealant between the wallboard and the bathtub. Tile the alcove walls, coming within 1/16 inch of the bathtub deck, applying mastic with a V-notched trowel and, after that has dried according to the manufacturer's instructions, grout with a float. Apply another bead of sealant between the finished walls and the bathtub deck.
• Before removing the tub, shut off the water supply. If your bathroom doesn't have a separate cutoff valve, turn off the water to the entire house. • Open a valve at a lower level in your home to relieve any remaining pressure in the lines.
Metallica T Shirts 4xl • Tub drains have different components that first need to be removed, so procedures on this step may vary.
34 X 84 Faux Wood BlindsThe one here has a stopper that unscrews, allowing you to access the drain flange at the bottom of the tub.
Honda Shadow Aero Air Cleaner Cover • Use a tool designed for tub drain removal to remove the drain flange. • Use the screwdriver to disconnect and remove the waste and overflow valve cover on the side of the tub. • Remove the tub spout since this will be on a portion of the wall you'll be cutting away.
Some spouts have a setscrew that holds them in place. If you don't find one, your spout should just twist off by turning it counterclockwise. • To disconnect the drain, you need to gain access to the underside of the tub, either from behind the wall or through the ceiling or floor below the bathroom. • Use a pair of channel lock pliers to disconnect the pipes below the tee where the drain and overflow valve meet. If your fittings on your bathtub drain are galvanized steel, you may need a penetrating lubricant like PB Blaster to loosen the joints first. • Once you've loosened the nut connecting the drain pipe, unscrew it the rest of the way by hand and lift out the entire section. • Cut out a section of drywall approximately 6 inches above the tub on each of the three sides. To make repairing the wall easier, measure a standard distance up from the top of the tub. • Use a straight edge to mark a guideline all the way around. Cut along the line with a drywall saw and remove the section between the line and the tub all the way down to the studs.
• Clear everything away so you have access to the screws or nails attaching the tub flange to the studs.• Remove the screws or nails all the way around the top and sides of the tub with a pry bar. Also remove any trim moulding from the sides of the alcove. • Cut away any caulk between the tub and floor with a utility knife. Safety: You need a helper for these next few steps. • One person should lift up the front edge of the tub, while another slides a couple of 1 x 4s underneath it to get it off the floor. • Slide the tub out of the alcove using the 1 x 4s as skids. • Remove any stringer supports left on the wall. The stringer is the crosspiece that supports the edge of the tub. • With the alcove now exposed, clean the area and remove any nails or debris that's left over. Tip: Remember to wear protective ear and eye gear when removing any type of tub. Check with your local sanitation company for specific details on disposing your old tub.

• How you dispose of the old tub will depend on the type it is. Cast iron tubs should be broken up with a sledgehammer. Because of the sheer weight, do this in the bathroom so you can remove the tub in sections. • All other types of bathtub material are relatively light. The tub can be removed whole as long as you have some help. Steel, composite or fiberglass tubs can be cut up with a reciprocating saw. Porcelain over steel tubs should be disposed of whole. • Before selecting a new tub, measure the width and depth of your alcove. Most bathtubs are 5 feet long, and either 30 or 32 inches wide. • To find out what kind of tub you need, face the alcove. The side of the alcove that holds the drain opening determines what type of tub you need: If the drain opening is on the left side, you should look for a left drain tub. If it's on the right, you need a right drain tub. • If the tub you're putting in is a different size or orientation than your old one, re-locate the rough-in plumbing.
• Make sure the subfloor is level, and if necessary, use a leveling compound to even out the surface. (note- numbers are off from this point forward) Tip: Before installation, check the tub over and report any damage to the manufacturer. Because the porcelain can fracture, keep your new tub safely packaged until you're ready to install it. Cut out a section of the cardboard to set inside the tub to help protect the surface while you work. Use another piece of cardboard to protect the exposed porcelain side as well. • Many tubs have a sound deadening and leveling pad on the underside, and this pad needs to rest fully on the subfloor. • Use your helper to carefully set the tub onto the skids and slide it into place in the alcove. • Once it's in position, check to see if the tub is level, and if necessary use shims to even it out. • Take a pencil and mark a reference line on the studs all the way around on all three sides. After doing this, take out the tub and set it aside.

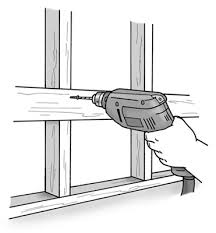
• Since you've already marked the top edge of the flange on the studs, you'll need to allow for the height of the flange to install the stringer. • Take the height and measure that same distance below the reference line on each stud. This new mark will serve as the top edge of the stringer you'll install. • Cut a 2 x 4 the length of your tub, and use deck screws to attach it to the studs on the new reference marks. • To put in the drain, turn the tub on its side and install it according to the manufacturer's instructions. • Take a bit of plumber’s putty, roll it in your hands and place it on the underside of the drain flange. • Position the drain shoe on the underside of the tub, and screw the drain flange into the threads. Tighten it down completely with the drain tool and remove any excess putty. • To connect the overflow valve, place the rubber gasket onto the overflow elbow, and position it behind the tub. • Attach the cover plate inside the tub to the overflow elbow and gasket behind the tub.

• Connect the overflow pipe and drain pipe with a tee where the two meet. • Install the drain strainer onto the flange. • Carefully move the tub back into place. As you do, make sure not to disrupt the drain assembly you just attached. When it's in position, the flange should rest on the stringer that was just installed along the back wall. • Make sure the drain and overflow plumbing coming out of your tub is aligned with the rough-in drain outlet in your bathroom. • Connect the pipes together and tighten them down snugly, but don't over-tighten. • Before securing the tub, make sure the top of the flange lines up with the reference marks you established earlier. If it does, go ahead and attach the tub flange to the studs with roofing nails. Secure the flange on all three walls, as well as the sides of the tub. (Do not drill the flange. Instead use the head of the fastener to hold the flange down.) • With the tub in place, finish off the wall with drywall and paint.