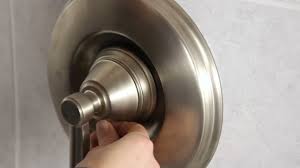
How To Remove A Moen Mixing Valve

How do you repair a shower mixer valve? Repair a shower mixer valve by removing the pressure-balancing unit, flushing the lines and installing a new unit. The project takes about one to two hours and the cost of parts is $75 and up, as of April 2015. How do I repair a shower mixer trap? How do you remove a kitchen faucet? How do you fix a leaking shower faucet? Remove the protective cap from the handle by prying gently with a utility knife blade. Remove the screw to that holds the handle in place and the handle. Take the two screws that hold the retaining plate out, and remove the plate. At this point, two screws that are the water shutoff valves are visible on either side of the valve. Turn them to the right before proceeding. Remove the brass screws that hold the front of the assembly in place to access the cartridge, and use pliers to pull the cartridge from the assembly. Clear the water supply lines by placing a paper plate under the valve to direct water into the tub, opening and closing each of the shutoff valves.

Install the o-rings in the new cartridge and the cartridge into the existing unit, ensuring the keyhole at its back matches the key in the housing. Apply plumber's grease to the large o-ring on the front of the housing, press it into place and insert the retaining screws. Turn the water valves to the left to the On position. Replace the faceplate, handle and cap. How do you replace a shower valve? To replace a shower valve, remove the valve trim, then remove the old valve. Install the new valve by cleaning the pipes, removing the plastic cartridge from the valve, applying flux and inserting the pipes. Use a torch to solder the connections. What is a shower diverter? A shower diverter is a valve allowing users to install multiple shower heads in a single shower. The function is to divert the single water flow into one or more additional shower heads or handsets. Why won't my shower work? While showers are generally dependable, a malfunctioning diverter valve on a tub-shower combination prevents changing the water from the tub spout to the showerhead.

Installing a new, low-flow showerhead with an older diverter valve sometimes causes problems. Replacing the tub spout with a new one usually fixes either problem. How does a shower mixer tap work?
Voodoo Tactical T Shirt Hat Combo A manual shower mixer tap mixes the water and allows the user to control the tap until the water is at the right temperature.
Mando Books Sell BackThe thermostatic tap mixer valve contains a device that measures the temperature of the water flowing through the valve.
Persian Kitten For Adoption In Nc How do you solder copper pipe joints? How do you wire a Honeywell zone valve? What tools are needed for single-lever faucet repair? What is the function of an EGR valve? Why is the water disappearing from my toilet bowl?

How does a toilet syphonic system work? New cartridge, if necessary When a shower faucet does not give out hot water, you can troubleshoot it step by step. A possible cause for this is that the valve stop for hot water is in a closed position. This prevents the heated water from passing through the valve. Other possible causes could be related to the temperature limit stop or to blockages in the valve. You can resolve these issues if you follow the steps below. Locate the hot water heater and tighten the valves to cut off the water going into the faucet. Turn the shower faucet back on and drain the remaining water in the pipes by allowing all the water to come out. With the flathead screwdriver, open the plastic cover located at the top part of the faucet handle. Pop off that plastic cover and set it aside. Inside the hole, locate the screw. Use a Philips screwdriver to loosen it, and take it out along with the handle. Pull out the metal sleeve and unscrew backing plate.
Align the faucet handle parts for easier reinstallation later. Locate the valve stop for the hot water. If you find none, skip Steps 3 and 4 and proceed to Step 5. Insert a flathead screwdriver into the hot water valve stop, turn one quarter to any direction to make it into a vertical (closed) position. Replace back the Faucet Handle in the same order you took it out. Turn on the water source and check if hot water flows out. Otherwise, repeat Steps 1 and 2, skip Step 3, and proceed to Step 5. Pull out the limit disk, if any, and sleeve. Pull the limit stop towards you and rotate it to the left to maximize the hot temperature. Stay within the range, otherwise the limit stop will not close or return to position. Push it back to close. Check for water flow as in Step 4. If no hot water flows out, repeat Steps 1 and 2, skip Steps 3, 4, and 5, and proceed to Step 6. Pull out retaining clip that holds cartridge in place. With a pair of pliers, grasp on the tip of the old shower faucet, and pull it straight out from the valve.

Allow excess water in the pipe to drain. Turn the water source back on and allow water to flow out of the faucet valve for about 3 to 5 minutes to flush out debris or any blockages. Inspect cartridge for any hard water deposits or broken parts. Clean or purchase a new cartridge, as necessary. Insert the cartridge into the faucet valve, and put in the retaining clip and backing plate. Return the plastic stops, if any, by aligning or orientating its market to the close position of the faucet. Put the faucet handle back on and reopen water valves controlling the flow of water into the house.Faucets are important for convenience and decoration in kitchens and bathrooms. A faucet simply is a valve that controls the release of water into the sink. Many makes of kitchen and bathroom faucets are available, and among these, Moen is one of the most well-known brands. Alfred M. Moen started this company, and buyers recognize Moen as one of the best water fixtures. Moen products add style and grace to kitchens and bathrooms, and users experience their durability and quality.

These faucets leak when they wear out or the cartridge gets dirty or corroded, so buyers need to know about the design of Moen faucets and the required steps to repair them. Moen concentrates on product designs that are beautiful and durable. The company offers a variety of sink, bathroom, and kitchen faucets, so buyers can select designs that match their home decor. Most faucets are of single handle design, though some have double handles. The designs have used simple cartridges since 1960s. The company calls this cartridge the Moen 1225. It is a plastic cylinder 4 inches long and 3/4-inches in diameter. The cartridge is the engine of most single handle faucets and Moen has revised its design at least two times. Even after revisions, the newer version of the cartridge remains compatible with the older faucets. In single handle designs, pull the stem of the cartridge through the handle to open the water supply and rotate it towards the left and right to get hot and cold water, respectively.

Many users prefer to repair a leaking Moen faucet themselves without the assistance of a plumber. Moen faucets have a specific cartridge in place of a valve stem. This makes the repair process relatively easy. Repair the faucet using the following simple steps The first step is to turn of the shutoff valves, which is usually in the cabinet below the sink. Turn off this valve to stop the flow of water to the faucet. Rotate the knob in the clockwise direction until it stops. Next, turn on the faucet to run out any extra water inside it. For a faucet with two handles, isolate the leak to one handle and work on the cartridge of that handle. Look for a screw that holds the handle in place. If it is visible on the outside, unscrew it with a Phillips screwdriver. In many designs, the screw is under a plastic cap. Remove the cap with a slot screwdriver or a sharp knife. Faucets with a metal lever handle have the holding nut under the handle. Use an Allen wrench to unscrew it. Lift off the handle.

Moen faucets have a nut that holds the cartridge in place. Unscrew the nut with channel locking pliers. Wrap a cloth or rag around the nut to prevent damage to the finish. In some designs, a pin holds the cartridge in place. Pull the pin straight off with needle-nosed pliers. Now, reattach the handle to the valve stem and use it to pull out the cartridge. Alternatively, use channel locks to pull out the cartridge. Take a picture or make a note of how the cartridge sits in the valve or the faucet handle body to reinstall it correctly. Take off the O-rings around the cartridge with a slot screwdriver. Examine and replace them if they are worn out. Locate the rubber seals in the inlet holes of the valve seat. Take them off in a similar manner, and replace them if required. Clean the cartridge to remove mineral deposits, which can interfere with the flow of water. Spray a jet of water on the deposits, or chip them off with a screwdriver. For sticky deposits, soak the cartridge overnight in vinegar to dissolve them;

wash them off in the morning. Replace the cartridge if it has cracks. Buy the correct replacement of the cartridge. Most buyers prefer a name brand replacement cartridge. Insert the clean or the new cartridge in the valve seat in the same way as the initial orientation. Place the pin or the retaining nut back in position. Similarly, reattach the handle and turn on the water to test the faucet. The sellers of eBay provide a broad range of Moen faucets in many different designs. To begin your search, enter the keywords, "Moen faucet" in the search field. You can find faucets available either individually or in sets. Select from a large number of categories and subcategories to narrow down your search to the desired type of faucet. Different products required to fix a leaking faucet are also available. Enter the appropriate keywords for the search. Moen faucets add an attractive designer touch to your kitchens and bathrooms. Users find it very easy to repair them at home with a few replacement products and a little know-how.