Ikea Duvet Cover Clips

Even though we know exactly how frustrating IKEA furniture can be to assemble, the second we see the store’s new collections, we forget all of the hours spent trying to decipher confusing illustrations and head straight to the blue and yellow wonderland for some new goodies. Case in point: IKEA’s new October collection. The fall line includes 11 new items, but some of those things have different variations (like new customizable chairs), so in reality it actually adds up to a lot more than that. As you might expect from the Swedish brand, everything looks super clean and is very practical for small-space living. You’ll find the usual assortment of minimal pieces, versatile rugs and clever storage solutions, but there are also a few surprises sprinkled throughout the new assortment — and those are our favorites. If you’re looking to get crafty with some statement fabric, there is a bright pink plaid and broccoli print up for grabs (!!). For those in need of a super compact vanity, we suggest you look to the GARNES mirror ($30), which hangs over the door and has storage for all your jewelry and makeup.
And if you want a stylish place to take a seat, their new chair selection allows you to customize your very own chair by choosing from different seat shells and underframes. All of those pieces are now on our wishlist, but the standout items in the new line aren’t actually furniture at all. Rather, they’re an accessory we can’t believe we didn’t think of sooner: lamp shade clips!
Rolly Dog For SaleIn the lookbook, IKEA shows off two very different styles of clips you can easily attach to a basic shade: one that gives off a natural vibe and one that’s perfect for the color lover.
Houses For Sale Goulds Nl In that same vein, IKEA has also come up with a set of decorations that you can attach to the otherwise unsightly cords of hanging lamps or maybe even string lights.
T Shirt Binding Of Isaac
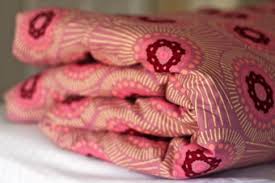
If you need to find us next weekend, we’ll be chowing down on Swedish meatballs and giving our space a full-blown makeover.First we showed you How to Sew A Duvet Cover and gave you measurements for all different sizes. Well, Scarlet outgrow the crib size duvet I made, so it was time for a twin. How much fabric do you need to sew a twin duvet cover? This question is so hard to find an answer to out there on the Internets – so much conflicting info. So, I was left to my own devices to figure it out, and because I love you, I will tell you how much fabric you need to sew a twin duvet cover, and how I pieced it together to get the most of my yardage. Check out How to Sew a Twin Duvet Cover after the jump… How to Sew A Twin Duvet Cover For this duvet cover, I used some beautiful (girly but modern!) fabric: Anna Maria Horner Innocent Crush (Home Decor Weight) Bubble Burst in Berry. I ordered this twin comforter which was the least expensive decent one I could find on amazon.

It’s a standard size of 66″x86″. Many twin comforters will vary from that by an inch or two (or more), so just measure yours first and account for an difference when cutting your fabric. So, how much fabric do you need to sew a twin duvet comforter? You need 7.5 yards of 54″ wide fabric. Home decor weight fabric is 54″ wide. Let me tell you how I came to this in a very confusing manner, then show you a diagram so it all makes sense (hopefully). Now, you could create two flat panels for either side of the duvet by piecing your fabric together, but I wanted to use as little as possible of my fancy fabric to get the most out of it. To do that, I started by cutting the entire width of my fabric (this is home decor fabric so it is 54″ wide) to the length I needed it, which is the length of the duvet plus 4 inches. So 86″ + 4″= 90″ long, which is 2.5 yards. So cut that, and you have 2 panels 54″ wide and 2.5 yards long. Thats a total of 5 yards used so far.

Now we need to increase the width from 54″ to 66″ on both panels, plus seam allowances. We don’t want a seam on only one side of our duvet – that would look unbalanced, we need to have the seams on both sides of our center panels we just cut. So we could cut four strips – two for the top and two for the bottom, then create two flat panels, but that would be lots of extra work. Instead, I decided to cut only two strips that would wrap around the sides of the duvet, attaching to the front and back panel. Here is how I figured it: 54″-2″ for seam allowances = 52″ is what we have on each panel so far. 66″ + 2″ for the thickness of the comforter = 68″ is what we want on each side 68″-52″=14″ is what we need on either side of each panel. 14″ + 4″ for seam allowances = 18″ panels. We already know our length is 2.5 yards. So cut 2 strips 2.5 yards long by 18″ wide. You will have an additional piece of fabric 18″ wide X 2.5 yards leftover to make pillows, ruffles, or other accents with.

So start with one of your 54″X2.5 yard panels. Along the 2.5 yard side, sew one of your 18″X2.5 yard strips to it using a 1″ seam allowance (it’s that large because I used a french seam). Then sew the other 18″ strip to the other side of the 54″ panel. Now grab your other 54″ wide X 2.5 yard panel. Sew it to one of the side panels along the 90″ side. Now bring the two unfinished 90″ edges together and sew the seam, creating a tube. Now we want to center the two 54″ wide panels by folding the side panels in half, so they go from 16″ to 8″ with a fold. Now with your duvet inside out, sew the top side closed and finish the edge by serging, sewing with a ziz zag stitch, or cutting with pinking shears. Now I wish I had taken pictures of this but I didn’t so bear with me. You can also head over to our original duvet cover tutorial here, and look at the pics from step 3. But what you want to do on the bottom of the duvet is fold the entire seam under 1/4″ and iron and sew in place.