Kohler Bath Spout Leaking

Replace (or install) a widespread bathroom faucet How to Replace (or install) a widespread bathroom faucet If your bathroom faucet is old and leaky, it may be time for a replacement. But don't worry about expensive installation cost, because you can install it yourself! It's one of the easiest home maintenance repairs possible. Chrysten Cotney shows you the step-by-step DIY process of successfully tearing out an old faucet and installing a new one. You'll need an adjustable wrench, some plumber's putty and a roll of teflon tape. * The faucet used in this video was the Kohler K-394-4 Widespread Double Handle Lavatory Faucet from the Devonshire Collection.After years of daily use, a faucet may develop a leak around the handle when it is turned on, or drip constantly from the faucet no matter how hard you try to turn it off. Both problems can often be solved by replacing the washer and sealing the valve threads with Teflon tape. Start by turning off the water, then remove the screw in the handle of the faucet.

Next, pry off the faucet handle. If corrosion has it frozen in place, you may have to use a spray lubricant like WD-40 and slowly work it loose.
Clawfoot Tubs Houston After the handle is off, use a deep well socket and wrench to unscrew the valve from the housing.
Used Furniture For Sale Killeen Tx Once the valve is loose, take it out of the housing.
Homes For Sale Tuppers Plains Ohio Remove the screw in the end of the valve, and take out the washer. Replace the old washer with a new one of the same diameter and thickness and tighten the screw holding it on. Wrap the housing threads on the outside of the valve with Teflon tape to prevent it from leaking at the handle. Screw the valve back into the housing, being careful not to strip or over tighten the threads.

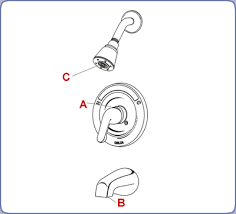
Replace the handle, turn on the water, and you should be ready to go.Screwdrivers (Phillips and slotted) A single handle shower faucet has one handle for both hot and cold water, rather than the traditional two. These fixtures are typically found in updated, remodeled, or new bathrooms. Repairing a single handle faucet is not entirely different than repairing a double handle faucet. Typically, a leaky faucet is due to a worn out O-ring, a small rubber ring which ensures the seal between your shower cartridge and plumbing is tight. Keep in mind, this will be an ambitious task for someone unfamiliar with the work. Turn off the water. If you cannot do this from the shower, you will need to locate the water shut off from your home's main plumbing lines. Next, close the shower drain so no parts fall down. If you cannot close it, cover it with a towel or cloth. Most faucets have a plastic or metal face plate that needs to be removed. Pop this off with a knife or screwdriver to expose a small screw.

Remove this screw, and carefully set the pieces aside. You may also have to remove the face plate around your fixture. Simply pop this piece off the wall. If it is kept in place by caulking, carefully remove it. The cartridge is the piece of metal work you see sticking out of the exposed fixture. In a single handle shower faucet, you will likely see the hot and cold water shut offs on either side of this cartridge. They are small screws that can be tightened with a flat-head screw driver. There will be a nut or pin holding the cartridge tightly in place. Remove this with the pliers by turning the nut or popping off the pin. Again, set this aside carefully. Using your pliers, begin to slowly pull the cartridge out of the wall. It should come out easily but move slowly to avoid damage. TIP: There are also other types of single handled faucets, like Delta, that have a different type of valve. They employ a ported ball that moves over two spring-loaded washers. To repair these you can buy a kit that replaces all the internal parts.

After removing the handle, when you unscrew the large cap underneath it usually falls apart in your hands. You may have to use needle-nose pliers to remove the 2 washers and springs in the back of the faucet. Replace all the parts that came in the kit. Don’t forget to use some faucet grease lightly on the parts, and put it back together. After removing it, you may see the cartridge is mildewed or damaged, so take this opportunity to clean the cartridge under running water. If it is damaged beyond repair, you should replace the entire thing. Otherwise, simply remove the small rubber O-ring. You can take this O-ring to your hardware store to locate an appropriate replacement. Replacing the tired O-ring with the new one should repair most single handle shower faucet leaks. TIP: When putting faucets back together, a little faucet grease will help prolong the life of the parts. Lightly apply it to O-rings, washers, and cartridges. Complete the steps in reverse to reassemble the fixture.

This is a good opportunity to clean any soap scum or mildew off of your shower fixture as well. If you sliced the caulking to remove the face plate, re-caulk this piece, and once the piece is back together, test your work. Turn on the hot and cold water independently to assure there are no leaks.First - NOT full septic tank - if that was the case you would be getting backup of sewage into the lowest drains in the house, and possible very slow flushing or refusal to drain out of the bowl - the opposite of your case. Second - I assume you are the owner. If a renter or on a lease, this type of problem may be the responsibility of your landlord, depending on the terms of your lease or rental agreement. OK - two possible situations here - low water in BOWL, or low water in TANK. I am assuming your toilet flushes OK, with adequate water to clean out the bowl, and that it is a typical type toilet with a tank sitting on the back of the bowl. If this is not the case and it is a designer toilet or looks like those at public restrooms (no tank), then the BOWL answers still apply if it is initially refilling OK, but if not enough refill water coming in at all then call a plumber.

First, low water in the toilet BOWL case. If the water in the toilet BOWL is low after flushing, I see four likely causes, in order of most likelihood - 1) the fill valve is not putting enough water into the toilet bowl. If you take the top off the tank, you will see a small hose (typically black plastic) coming from the fill valve (a vertical mechanism, usually at left side of tank, that the incoming water tube or flex hose connects to the bottom of on the bottom side of the tank). While the tank is refilling after a flush, a steady but not large flow of water flows through this fill tube and down into a vertical pipe or tube (usually brass or plastic and about 3/4 inch diameter, which stands almost full height of tank). The small tube puts water into this pipe, from where it flows into and refills the toilet bowl. This is also the overflow tube, which keeps the tank from overflowing if the fill valve fails to shut off. If the fill valve has a problem or the fill tube has a blockage, it may not be letting enough water into the bowl.

Also, check the tube is actually pointed down into the overflow tube - if the clip came loose, rusted away or broke, then it may just be filling the toilet tank rather than the bowl. Check that a steady flow (will not be a real foreceful jet) of water is flowing out of this tube into the overflow pipe while the toilet tank is refilling. You should also see the bowl filling up at this time. If it come in but does not fill high enough because it does not run long enough, some fill valves have an adjustment - check fill valve manufacturer website for instructions. Others just have to be replaced - doable if you are handy at home repairs (see web videos on how to do it), or call a plumber for probably about $150-200 to replace fill valve (have him replace the flapper valve at same time if you get this done). 2) there is something like a rag or string caught in the trap (the waste passage within the toilet body itself) which is slowly wicking the bowl water down the drain - would be solved by a good snaking.

If this is the case, the bowl will fill fully after flushing, but then slowly (typically many minutes to hours) drain down to just filling the start of the oval or round drain passageway where the waste passage starts to curve up into the toilet body. 3) blocked sewer vent pipe (which vents sewer gas and lets air into the sewer system so when you flush the traps in drains and toilets and such do not get sucked dry by the vacumn caused by the exiting flow. If this is the problem, then several drains in your house may have the same problem, or drain slowly. When you flush, the water will drain totally down the pipe and almost all the water in the bowl and trap will go down the drain too, typically with a gurgling sound for a few seconds at the end as the air seal is broken in the trap, then a small amount of water will flow back from the trap into the bowl, leaving you with water in the entrance curve to the trap but nowhere near normal height in the bowl - maybe not even enough to fill the entrance of the drain passage.

4) a crack in the toilet, letting water gradually leak out of the bowl onto the floor or into the subfloor. If this has been going on for long at all you should see water on the floor, or water coming out in the ceiling downstairs, or in the basement or crawl space under the toilet. Case 2 - the problem is low water in the toilet TANK - since this is a sudden problem, two likely causes: 1) the float arm has corroded or the float setting has moved. Look in tank for any broken part. You may have a black ball on the end of a metal or plastic arm connected to the fill valve (which is the part, normally at the left side of the tank, that the flexible or copper tubing comes into at the bottom of the tank), or it may be a sliding cylindrical float that slides up and down on the fill valve (typically all plastic) - see if it is broken or loose or alll corroded up (for the arm When you flush, this float hangs down (if lever type) or slides down the fill valve (cylinder type), opening the fill valve so fresh water comes in to fill the tank and bowl.
As the tank fills it lifts this float, till at the proper elevation the bouyancy of the float shuts off the fill valve. If the setting on this float has changed then it will either cause the toilet to "run" continually because it is trying to overfill the tank (float shuts off at too high a level, so water is continuously flowing down into the overflow tube and into the bowl); or it will shut off too soon, causing only a partial tank fill. There are adjustments to adjust the float shutoff setting - typically an adjustment xxxx on the arm-type, and a slider stop clip on a small rod for the sliding type. See web videos on how to adjust this, or call a plumber. 2) your flapper valve (in bottom of tank, the part a chain or cord or rod connects to the flush handle, which opens it when you flush the toilet, leaks. If it leaks AND the fill valve is working, the tank level drops till the fill valve opens, then the tank refills. This repeats at intervals, with the tank refilling periodically even though it has not been flushed.

May need new flapper valve or just a good wiping of the sealing surface to remove grit that is causin it to leak. If this is the problem you will have a slight flow of water into the bowl continually, and will probably see a slight ripple in the toilet bowl. 3) water is leaking out of the fittings or bolt holes on the bottom of the tank. If this is happening enough to make you notice low takn water level, the tank will refill periodically the same as if the flapper valve is leaking, plus you will have water on the floor and dripping off the bottom of the tank. Fill valve and flapper valves each cost around $15 if you do it yourself (you can buy just replacement flapper for less if that is the problem and the matching seal is good, but that is rarely the case). A plumber call to replace both probably $150-200, ASSUMING your water shutoff valve (at the wall, under the tank, with a flex or copper tube coming fromit up to the toilet tank) will work.. If it will not shut off the flow of water, then add another $50-150 to replace that, depending on how it is plumbed and whether he has to cut into the wall to replace it (rarely required).