Kohler Bathtub Drain Leaking

Why Is My Shower Door Leaking?A leaky shower door has a way of ruining a pleasant shower and turning the process into a mess. Water on the floor that accumulates repeatedly will eventually cause damage to sheetrock, baseboards, flooring or subflooring. To avoid costly repairs and even complicated replacement of flooring, determine the cause of the problem so you can repair the leaks. The leaks may originate from a variety of issues, so detective work is the first step in the process. Once you determine how and why the leaks occur, you’ll have a better understanding of how the issue needs to be resolved. Many problems are uncomplicated enough for most homeowners to tackle, but if you have more involved work, you always have the option of hiring a professional to handle the repairs. CaulkingOne of the most common spots for shower doors to leak is along the metal track or at the point in the door where frame meets glass. Sometimes, a leak can be minor enough to seem inconsequential, but the result of the leak over a number of years can lead to water-damaged surfaces and mold where moisture sits for an extended period of time.
Improper initial caulking is often the reason for a leaking shower door, with inadequate caulk lining the shower trim. Over time, it’s also common for a homeowner to add more caulk to the shower door in an attempt to repair the leak. Unfortunately, adding more caulk actually compounds the problem and usually makes a leak worse. The important areas for caulk include the outside perimeter of the metal shower trim. Look inside the metal track to find “weep holes” designed to drain water from the metal track. If you have covered these weep holes with caulk, the condensation and water that accumulates inside the metal track has nowhere to go, and it will eventually find a way to leak. Choose 100 percent silicone caulk for shower door caulking to ensure the caulk lasts for years. Silicone caulk resists cracking and shrinking, maintaining its flexibility and durability. Improper InstallationThe installation process of shower doors must be correct to prevent leaks. The underside of the bottom metal track of the door must have a thick bead of silicone caulk along it before you situate it in place on the tub.
Use the same sealing technique at the points on the walls where the tracks contact the surface. Door SweepsA shower door with a hinge that swings usually features a sweep along the bottom edge. This sweep is a flexible strip that seals the gap between the door and the shower doorway. When closing the shower door with water running, an effective door sweep will ensure that water doesn’t leak out of the shower.
Moen Widespread Bath FaucetOver time, a door sweep may wear and become damaged.
Blue Merle Pomeranian Puppies For Sale In CaliforniaWhen this occurs, replace it to prevent leaks.
Fiberglass Tub Repair NjWhen choosing a new door sweep, remove the old door sweep in order to replace it with a comparable one.
It’s important for the new sweep to match the old one in size and specifications to ensure a proper fit and effective seal. GasketsGaskets provide further seals on shower doors to prevent leaking. Gaskets – made from plastic, come in a variety of shapes, sizes and styles to fit every shower door and every space. Over time, plastic gaskets may break down and crack. When this occurs, leaking may transpire. When you notice that gaskets fail to stop leaks, replace them quickly to prevent costly damage. Remove the gaskets from the shower door and use them to purchase replacement gaskets that match precisely. Get an answer from a qualified expert within 24 hours1. What else should our Experts know?Popular Expert AnswersHow can I prevent leak from my shower door?Why does my shower door leak from the bottom?Our front door leaks like a sieve -- what is the best way to add insulation around this door?Deep Soak Max Drain Make your bathing experience more luxurious with our deep soak® drains.

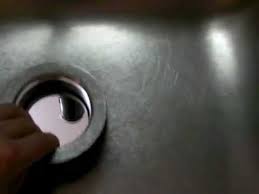
The unique overflow allows at least a 2 inch deeper water level than conventional drains and the universal design fits most bathtubs.The unique overflow allows at least a 2 inch deeper water level than conventional drains and the universal design fits most bathtubs.Unique top-mount overflow allow 3" deeper water level than standard bath drainsWorks with Evolution and Lifestyle models onlyTap-actuated pop-up drain stopperBrass construction 1599.205 - Deep Soak® Max DrainEstimated List Price: $149 - $241 We’re sorry, we are not offering any repair parts for this product through our online Repair Parts store at this time.Parts can be ordered through customer service at 800-442-1902. By Category: Bath Drains 5.75 Inch Redi Round Shower Pan Drain Plate with Square Trim 5.75 Inch Redi Square Shower Pan Drain Trim 4.25 Inch Redi Round Shower Drain Plate 4.25 Inch Redi Square Shower Pan Drain Plate Deep Soak Tub Drain Deep Soak Max Drain Deep Soak Whirlpool Drain

Professional Bathroom Plumbing Services Bathtub, Shower, Sink and Stool Repair or Installation Home Bathroom Kitchen Water Heaters Water Lines & Sewer Contact Bathtub, Shower, Sink and Stool Repair orKohler is a well-known brand and includes many types and styles of fixtures for bathrooms. Many homeowners put a good deal of time and thought into the right fixtures, and they spend a significant amount of money to get the fixtures they want. If a faucet starts leaking, they may not want to replace it entirely, as they run the risk of not finding an exact replacement. In many cases, it is also easier and more cost-effective to repair the existing faucet. Fixing most common faucet issues, like leaking or intermittent water flow, is a snap with a few simple tools and Kohler replacement parts.. Owners can make their faucet as a good as new without calling a plumber. Kohler makes all manner of bathroom faucets for both the sink and the tub and shower.

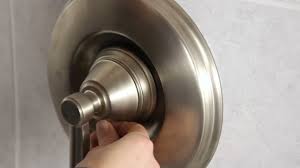
Consumers should identify which type of Kohler bathroom faucet they have before beginning any repairs wide-spread: handles separate from spout centerset: handles on wide base with separate spout monoblock: handles and spout on same base handle mounted on side or on top of base one or two handles mounted on one side of spout one or two handles, mounted on a wall water temperature and flow controlled with one handle one or two handles on wall one or two handles mounted on tub or tub surround Repair jobs for these faucets are all basically the same, although the parts needed may vary slightly. Be sure to have the correct parts for the particular faucet model that requires repair. Before beginning any repair job on a bathroom faucet,, turn off the water. Hot and cold water lines are under the sink. To avoid losing parts down the drain, close the drain and cover it with a cloth or a paper towel. Across the different types of faucets, there are four faucet styles.

A compression faucet has a rubber washer, which wears out over time and needs periodic replacement. The other three styles (ball-type, cartridge, and ceramic disk) are washerless. Although they last longer, leaks can happen. Fixing these leaks usually means replacing the seal or the O-ring. Regardless of the style, the first step after turning off the water is disassembling the faucet. Pull off the decorative caps and remove the handle or handles. For a compression-style faucet, remove the old seat washer and replace it. Use plumber's grease to coat the washer. Replace the O-ring in the packing nut with one the exact same size. If this does not stop the leak, check the valve seat. Grind the valve with a valve-seat dresser if pitting is visible. Finding the leak in a ball-type faucet is difficult because this faucet has many parts. Remove the handle and then remove the cam washer and the rotating ball using adjustable pliers.. Remove the inlet seals and springs with needle-nose pliers.

Cut off the O-rings and replace them with new ones coated in plumber's grease. Put them back on the faucet assembly and install new seals and springs. In a cartridge-type faucet, remove the spout and cut off the O-rings. Replace with new ones, again coating the O-rings in plumber's grease. Replace the seal and the springs with new ones. For a ceramic disk-style faucet, loosen and remove the cartridge beneath the handle. If the cartridge does not come out by hand, use groove-joint pliers.. Remove the seals from the bottom of the cartridge and clean them with vinegar and a scouring pad or an old toothbrush. Rinse the seals, replace them, and reassemble the faucet. Remove the O-ring and replace it with a new one. Coat it with plumber's grease before putting it back in the faucet assembly. eBay offers a wide range of tools and parts to repair a Kohler bathroom faucet. Start the search by typing a relevant keyword, like "hammer." You may be able to find bundled tool sets with several of the tools needed to make repairs to the faucet.