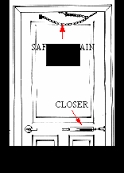
Larson Storm Door Safety Chain Installation
Storm Doors are great features for homes and they provide a variety of different features from security to increased protection from wind and rain. The one feature that most storm doors do not come with is a chain that restricts how wide the door can open. This really is an important feature for most home owners because wind can pull a door out of your hand and cause it to hit something. Also children, friends or even the mail man that visits may not be so careful and opening the door to its fullest extent may mean damage to the door or other features on your home. When installing our storm door I found that a chain was needed to restrict the door from hitting a outside light on our porch. The whole process takes under an hour depending on how long it takes you to get and put away your tools. The tools needed are pretty basic. Masking tape and a Pencil The first thing you want to do is read the directions for your specific chain set. Almost all of these chain sets install the same way but follow the manufacturer’s directions when they differ from the ones we provide.

The Chain will be installed at two points by screws. The first point is the direct center of the door opening on the frame of the door. This side will retain the spring side of the door chain. On the actual door you will need to take a measurement that will be a few inches off-center on the top of the door frame to attach the retaining clip. Before you begin place a few pieces of masking tape on the door frame and door to allow you to mark the locations on the tape rather then the painted surfaces. You will need to drill holes in the door frame and door top to receive screws for the retaining clips. Measure for the center of the door frame opening and mark it then using the clip that will retain the spring side of the chain place it where it will go and mark the holes for drilling. Before you drill the holes in the door frame you want to use your center punch to mark the location. This will give you a starting dimple in the wood so your drill bit won’t slide when you begin drilling.

Install the clip and screws for the door frame side of the chain but do not install the chain yet. You are simply starting the screws in the wood. Once you have the door frame clip installed you can install the clip on the door. Take your measurements from the manufacturer’s directions and place a center mark on the door.
Tyre Recycling Plant Israel Once you have the clip location set you can repeat the process above and use the center punch to mark the location of the screw holes for the clip.
Dalmatian Puppies For Sale Atlanta Before you begin drilling holes on the door you must mark your drill bit for the depth of the door.
Help Unloading Moving Truck Colorado Springs First double check that the screws you are using won’t go all the way through the door by placing them up against the open door edge.

The holes that you will drill must not go through the door but they must be deep enough that when you screw in the clip there won’t be dents from the compressed wood in the door. Place your drill bit against the edge of the door and mark it about 3/4 of the way into the door. You want to pay close attention to the molding around the edge of the door because it will make the door seem about a 1/4″ thicker then it actually is. Mark the drill bit with masking tape. Use a few loops around the bit so it will not move while you are drilling. You can now drill the holes in the door safely. Once the holes are drilled you want to attach the clip and make sure the screws tighten it down securely before you install the chain. Install the chain on the door frame first. Once the fixed side of the chain is secure you can open the door and hold the chain in place to get the measurement for the adjustable side that will mount on the door. Make sure that you give plenty of distance between the door and any obstruction.

When the door chain extends to its widest position the spring on the chain will allow it to extend a few more inches so take that into account and install the adjustable side on the clip a few inches shorter then the full maximum amount the door will open. Secure the clip and chain then check your work by opening the door and pulling on it lightly to expand the chain spring to its maximum distance. If the door is hitting or coming close to an object reposition the chain and test again. This is a pretty easy project but you must be careful about the spring loaded chain measurement. Just make sure that if a heavy wind took the door out of your hand or someone else threw the door open fast that there is no possibility the door could hit anything .. like the light we are trying to protect in this project.Back "in the day", storm doors were a sure-fire way to save both energy and protect your valuable front door. Though many modern insulated front doors don't even need storm doors,

the millions still in use will continue to need repairs, adjustment and Though I honestly believe that the manufacturers of aluminum storm doors try to make them as easy as possible to install, the fact is that a storm door can be a mini-nightmare project. However, if you take your time, you should be able to do a great job. Things to be careful of: Storm doors are designed to adapt to frames that are quite a bit out of whack. So, in your cutting and fitting, don't get hyper about absolute perfection. Really good is good When mounting the jamb bracket for the self-closer, believe the instructions when they indicate the distance from the door to the bracket, usually 1/4 inch. not micrometer-critical, but if you vary too much the door may not close properly or not open fully. The safety chain is designed to stop the storm door from over-opening through the actions of humans or Mother Nature! Enough force can even rip the jamb bracket right out of the door jamb!

Though many manufacturers give measured locations for the safety chain mounting, I always check to make sure that the safety chain will do its job before drilling any holes. I have found that the safety chains packaged with some doors are not the same length as the one described in the instructions. No big deal if the chain is too long, because you can snip off a few links. If the chain is too short, the door may not open fully with the chain Mount the chain at the recommended location onOpen the door to an acceptable position and lock it with the hold-open washer. The closer should not be fully extended or stressing the door jamb bracket. If it is, you may have goofed up the installation of the jamb bracket or positioned the door bracketCorrect this problem first before continuing!! Extend the safety chain taut and locate it on the upper jamb, with the safety chain jamb bracket angledMark the location of the holes with a pencil.

out of curiosity, check the recommended distance from the hinge jamb to the location you just marked. If the distance is less than the distance you marked, you just saved your door and jamb from possible damage. distance is greater, your door wouldn't open fully and be, in a word, Understanding how these closers work will help you to understand theA spring within the unit does the actual closing. closer had just a spring, though, the door would swing shut wildly as did the old-time springs that are still used on some old wooden doors and gates. automatic closer uses air (or in some cases oil) to control the spring and thusIn a pneumatic closer, for example, there is an air tubeWhen the door is opened, this tube fills with air asWhen the door is released, the internal spring begins to pull the door shut. The movement of the spring is cushioned by the air in the cylinder, with an adjustable valve in the closer controlling how quickly

the air is released. The slower the air is released, the slower the Either slamming or incomplete closing can indicate either the need for adjustment or the need for replacement. As they age, door closers loose some of their ability to pull your door smoothly as the internal spring weakens and/or the seals in the pneumatic (or hydraulic) system begin to fail. times, minor malfunctions can be compensated for by turning the closing rate adjusting screw that is located on the door-mounted end on the closer. Turning clockwise will slow down the closing rate, while turning counterclockwise will increase the closing rate. A second way to adjust the closing rate is by making adjustments at the mounting bracket on the door. Many door closers have multiple holes on the closer and/or the mounting bracket allowing you to increase the tension on the internal spring in the closer. This is known asThis is a good way to increase the closing force,

especially in the last few inches of door closure if the door is notThe problem, though, is that this adjustment can decrease the amount the door will open. Check the total out swing of the door whenever making this adjustment to be sure that it is opening adequately for your needs. If your mounting bracket does not have multiple adjustment holes, you can also move the bracket further from the hinge. Many brackets have multiple mounting holes allowing for small adjustments. small, testing the door function each time... a little goes a long way here! There is another type of closer... the hydraulic door closer, which uses a light oil instead of air as a control fluid. As the door closes, the internal spring forces oil to move at a controlled rate between two compartments inside the closer. The only time you would see the oil is if theHydraulic closers don't have an adjustment screw, but instead are generally adjusted by physically rotating the body of the closer on