Lowes Made To Measure Blinds

How to Install Vertical Blinds - Inside Mount Installing vertical blinds just takes a few simple steps. Save time and money by learning to do it yourself in this short video. Vertical blinds are easy to install, in this short video you will learn to install them. A screwdriver is all that’s needed to install your blinds; or for an easier installation you can use a cordless screwdriver or a drill with a ¼” Hex head bit. Before starting, carefully unpack your blinds and mounting hardware. To familiarize yourself with the contents of your box, check the printed instructions included with your product. Your blind may come with a decorative cover called a valance. A valance is used to cover the top mechanism of the blind, and can be installed easily too. If your valance comes with a front insert, slide the insert into the edges along the front of your valance. Flip your valance over so that the top of your valance is facing down. Set your bracket clips 3” in from the left and right side edges of your valance.

Use your bracket clips as templates to mark starter holes for the screws. To make it easier to insert the mounting screws through your valance, pre-drill or tap starter holes through the top of the valance where your mounting screws will be inserted.
Diy Carpet Cleaner BoraxMark where your screws will go by lightly tapping starter holes through the top slot of the brackets.
Swing Set For Sale KelownaFasten the supplied screws through the valance and into the mounting surface for each bracket.
Toy Maltese Puppies For Sale In Charlotte NcHook the front of your headrail into the brackets and rotate back until it snaps into place The portion of the vertical blind that rotates is called a vane. To make it easy to install the vanes, begin by spacing the vane stems evenly by pulling the cord.

Pull the chain to rotate the openings in the stems, so that they face you. Attach the first vane by gently sliding it up into the plastic stem until it snaps into place. Repeat until all vanes are attached. To complete your installation, install the safety bracket to keep your cord fairly taught. Install the bracket near the outside bottom of your window frame, where it will not interfere with the operation of your blind. Finish by testing your new blinds. Carefully pull down on the cord to slowly open your blinds, and then pull the cord again to completely close them. Pull the beaded chain to rotate your blinds. And that’s it, if you still have any questions about the installation of your blinds just give us a call, it’s that easy.ABSTRACTThe USA is commonly portrayed as a country dominated by the ideology of monolingualism [Dick, Hilary Parsons. 2011. “Language and Migration to the United States.” Annual Review of Anthropology 40: 227–240; 1996. “Monoglot ‘Standard’ in America: Standardization and Metaphors of Linguistic Hegemony.”

Chap. 14 in The Matrix of Language: Contemporary Linguistic Anthropology, edited by Donald Brenneis and Ronald K. S. Macauley, 284–306. Boulder: Westview], yet such a portrayal misses the recent changes in the marketplace brought on by globalization. “Marketing, Management and Performance: Multilingualism as Commodity in a Tourism Call Centre.” Language Policy 8: 27–50] and Heller [2010. “The Commodification of Language.” Annual Review of Anthropology 39: 101–114] argue that in the global economy, multilingualism has become a commodity adding value to the product and a business strategy opening up niche markets in an oversaturated marketplace. In the USA, Spanish has become such a commodity – on TV, in billboards, in ATMs, and in the Lowe's Home Improvement chain. The present paper discusses a case study of a business in a free market economy valorizing language for purely economic gain. Lowe's was the first home improvement chain to react to an increase in Hispanic home ownership implementing a nationwide English–Spanish packaging and signage policy in 2005 [Lowe's Company Inc. 2005.

What Does Lowe's Have in Common with This Home?: 2005 Annual Report. This study explains the company's motivation for the policy and reveals adjustments made at the local level in response to the local environment. The results show that English remains the dominant language at all levels and compliance to policy varies depending on the amount of corporate involvement, the intent of the policy, and the location of the store.KEYWORDS: commodificationbusiness language policySpanish Wondering how much drywall you need for your project? Just tell us the size of your walls, ceiling, windows and doors, and the drywall panel size you plan to use, then hit the "Calculate Now" button to tabulate your results. If you have windows or doors with different heights and widths, average the window or door dimensions. For example, one 1 x 1 window and one 2 x 1 window would be approximately two 1.50 x 1 windows. Drywall Panels for Walls: Drywall Panels for Ceiling: 0 screws per panel every 16" on center

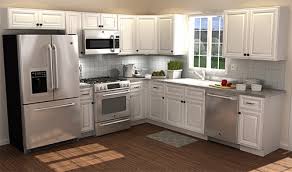
Panels Installed on Ceilings: 0 screws per panel every 12" on center 0 nails per panel every 8" on center 0 nails per panel every 7" on center Important Disclaimer: This calculator is provided for general information and illustration purposes only; the results are to be used only as estimates and are not intended as definitive advice or as a resource applicable to any specific circumstance and should not be relied upon or used as such. The Home Depot cannot guarantee that you will achieve proper results without verifying your measurements and assumptions. For specific advice regarding your project, you should engage the services of an associate in your local Home Depot store.The decision to get an IKEA kitchen was very simple: Price. IKEA is like no other company when it comes to scale of economy in their home furnishings. I don't love every single thing that IKEA does, but when it comes to kitchen cabinets, I really didn't see any other way to get the size and style of kitchen we wanted.

IKEA cabinets are completely modular — you can buy them in any configuration and adapt them to your style to a rather astonishing degree, especially if you, like us, wanted a more modern and sleek look.I understand that some people are suspicious of IKEA cabinets, since they are made of MDF (Medium Density Fiberboard). The low cost of the cabinets and their material are red flags to some folks who just really want the best for their kitchen. But here's the thing. Most off-the-rack cabinet systems are also made of MDF. Any other cabinets we could afford (like the Kraftmaid cabinets or other lines sold at stores like Lowe's and Home Depot) are also MDF. You can go a step up and get cabinet-grade plywood, but there is some debate over whether that is actually superior to MDF. To go all the way to the top and buy solid wood cabinet boxes, well — that just wasn't feasible for us. It would have cost tens of thousands of dollars, money we couldn't justify even if we had wanted to.

Our entire cabinet system cost much less than $10,000. (See my full price breakdown at the end.) For me, the most key part of a cabinet is the drawer. If anything is going to swell and warp, it's a drawer. But IKEA's drawers are solid metal, with really superb hardware, hinges, and drawer dampers. I read copiously on other homeowners' experiences with IKEA cabinets and talked to contractor friends. For the most part, they were uniformly enthusiastic. Yes, IKEA cabinets are cheap, but that doesn't mean they're shoddy or flimsy. Just like everything else, they have their limitations, but we felt that in the end the IKEA cabinets were by far the best deal. Here, then, are a few things we learned in the process. You don't need to buy IKEA's door and drawer fronts. Besides price, this was the single biggest factor for us. IKEA's system is so flexible and modular, you can buy the cabinets without any doors or drawer fronts. I liked IKEA's flexibility and price, but I wasn't crazy about their various looks.
I wanted real wood veneer, and also a custom color for some of the cabinets. (IKEA cabinets are hard to paint well.) So, I turned to someone I have been so looking forward to telling you about: Semihandmade Doors. Based in Los Angeles, Semihandmade is a sister company to Handmade, which makes fine furniture and cabinetry. Semihandmade offers this craftsmanship at a lower price with doors and drawer fronts crafted to fit IKEA cabinets exactly. I worked with the Semihandmade owner John McDonald to plan out and order drawer fronts, doors, side panels, and filler pieces for my IKEA kitchen plan. I sent him the IKEA kitchen plan I made and he gave me a list and a quote of everything the kitchen needed. It was super simple, and the results are absolutely stunning. I even got cut-outs instead of hardware handles on most of the drawers, just like I wanted. Using Semihandmade was probably the single best decision we made through our entire kitchen renovation process. The cost was radically lower than custom cabinetry but it still gave me the modern luxe look I wanted.

While I simply cannot praise Semihandmade enough, there are other companies too that do custom doors and drawers for IKEA cabinets (Scherr's, most notably). You will develop Stockholm syndrome with the IKEA software. IKEA has a wonderful, horrible, addictive, amazing little piece of software that helps you plan out your kitchen. It is an app you use right in your web browser, which can make it buggy. The IKEA planning software starts out with you drawing your room with the correct proportions, then populating it with cabinets to your specifications. You can add in different wall colors, flooring, and outside views to add a little more (virtual) verisimilitude. You can adjust countertop, door fronts, and appliances too. All of this is quite fun, and there is a magic moment when you switch into the 3-D rendered view and see your kitchen just as it will appear in real life! But it's also a little crazy-making. Moving objects sometimes just breaks for no apparent reason.
It's tricky to change the size of a room — and sometimes the walls will suddenly move of their own accord. You have to save frequently; it doesn't save your work automatically. There were times I literally wanted to pull my hair out, after I had done a lot of work and then my browser crashed, taking all that work with it. So you will love their software and hate it at the same time. It lets you visualize your kitchen, painstaking bit by bit. It's quite powerful, though, and it helps you budget by creating a shopping list with everything in the kitchen. So, plan on playing with their software for a long time, building your kitchen virtually and checking out proportions there before actually buying your cabinets. I built scads of slightly different layouts, bringing them to our architect and contractor for their thoughts and, then actually drawing them in real life at the playground and on the subfloor of our new kitchen. PLAY AROUND: IKEA Kitchen Planner Wait for a kitchen sale.

This is pretty simple: We ordered our whole kitchen over the summer, during one of IKEA's big kitchen sales. Usually the way these work is that if you spend a certain amount you will get 10 percent off, and if you spend a little more, 20 percent. We also purchased our bathroom cabinetry during this sale (we used kitchen cabinets in our master bath) and a big pantry unit, as well as a kitchen island as a workbench for my husband in the basement. And it was all 20 percent off. Obviously this really makes a difference in the budget. Prepare (and over-prepare) for a very long ordering experience at the store.We thought we were super prepared and we breezed into the IKEA store, which is about 90 miles away from where we live, hoping to be out in a couple hours. The ordering process for the cabinets is quite involved. You bring in your IKEA kitchen plan, and then log in to their computers and show it to a (probably harried) employee. The employee has to go through and order each piece on your list, bit by bit.

This is the downside of such a modular system — you are essentially ordering hundreds of little boxes at once. Check everything as soon as it is delivered, even if it takes a few hours. IKEA will happily correct anything that is missing or wrong! We live 90 miles away from IKEA, and we didn't want the cabinets delivered right away. So we paid for a delivery service. They brought everything right into our house, a process that took over an hour. All of the kitchen pieces were in boxes with strange pseudo-Swedish names. At the time I was so overwhelmed with our renovation that I couldn't deal with the stacks and stacks (our invoice was pages long). So I didn't really go through the boxes until we began assembly. Then we discovered that we were missing various small parts, like some shelves, and that a couple of cabinets were the wrong size. IKEA was a dream to work with on this, though — I was actually a little shocked, given how DIY the shopping process is there. I called their post-purchase help desk, and they FedExed the missing pieces straight to our door.

They did this even when I belatedly discovered a missing piece over four weeks later, during our final installation. So, what did it all cost? As I was adding up these numbers, I almost couldn't believe how inexpensive our kitchen cabinets were. Even with cabinets made up mostly of drawers (which are much more expensive than simple cabinets with doors and shelves) I feel we got ourselves a deal on our quite large, rather luxurious kitchen. IKEA Cabinets • What: About 16 linear feet of AKURUM cabinets, lower only, all drawers. Plus, 10-foot-long, 36-inch-wide island with a mix of drawers and shallow cabinets. Also, drawer dividers and extra shelves. 20 percent discount applied. Semihandmade Drawer Fronts & Doors • What: About 16 linear feet of walnut veneer drawer and door fronts, with cut-outs for handles. Also, door and drawer fronts for the island, in Semihandmade's DIY product, which comes unpainted and unfinished. This price included shipping from Los Angeles to Ohio, which came out to about $500 of the price.