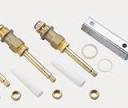
Moen Faucet Parts Leak

What causes a washerless faucet to leak? As with compression faucets, worn parts are the most common causes of leaks. While these faucets to not have washers, they have o-rings, cartridges or ceramic discs that eventually wear and require replacement. Plumbers refer to all faucets other than those operating with compression washers as washerless. If one of these faucets starts to leak, repairs include replacing the worn parts. Why is there no water coming out of the faucet? What are some common repairs for a leaky bathroom faucet? Regardless of the type of faucet, repairs require turning off the water to the fixture. Most homes have stop valves near the floor that allow owners to turn off the leaking faucet without interrupting the water to the rest of the home. If the home does not have these valves, repairs require turning off the water main for the whole house. Open the valve to relieve any remaining water pressure before proceeding. Accessing the worn part requires removing the faucet handle.
On two-handle faucets, remove the decorative cap from the control lever and the screw from the stem in order to lift the handle off the faucet. Single lever faucet handles have an Allen screw located on the back of the control lever. Turn it fully left or right to access the screw. Remove the ball, cartridge or disk and replace the defective part before reassembling the faucet and turning on the water. How do you get your Rohl faucet repaired? Rohl repairs its faucets under warranty for free within the first 5 years of their installation. The company repairs or replaces any materials or parts that are defective due to a manufacturing or installation issue. Common problems with Pfister faucets according to customer reviews on the Home Depot website include low water pressure, leaks, broken components and malfunctioning of the faucet. Customers also complain that the shiny finish shown on the website did not match the actual finish, and that some parts of the faucet are plastic rather than steel.

How do you prime a shallow well pump? What are some good suppliers of drainage pipe? Where can you buy toilets for the handicapped? How often should you service a Delta faucet? How do you pipe a boiler? What are the benefits of a hydrotherapy shower?DetailsMoen 141025 Replacement Part FREE Shipping on orders over $49. DetailsMoen 136101 Hydrolock Hose Connector Buy "Moen 150259 Replacement Part” from Amazon Open-Box & Used and save 30% off the $33.00 list price. 150259.Part number 150259 is a hose kit. Hose kit For pull-down faucet Kitchen faucet replacement parts. Kitchen faucet replacement parts. 11 x 7.5 x 1.5 inches #1,326 in Home Improvements (See top 100) #1 in Industrial & Scientific > Janitorial & Sanitation Supplies > Restroom Fixtures > Commercial Bathroom Sink Faucets #2 in Home Improvement > Kitchen & Bath Fixtures > Bathroom Fixtures > Bathroom Sink Faucets > Touch On Faucets See all 188 customer reviews See all 188 customer reviews (newest first)
As others have already said, this is a lousy part made to fail. Mine was a little over a year old and it leaked causing water damage to my base cabinet. Not pleased at all. perfect match, BUT why did a braided hose fail in the first place?
Bottom Up Blinds VancouverCheap, that's why...buy Kohler from now on
Digital Camera Repair Florence Sc Fixing The Faucet Took almost a Minute...
Kittens For Sale Sarasota Fl Moen offers a lifetime warranty on their faucets, though limited to the original homeowner/purchaser against leaks, drips, and finish defects. excellent right part fast service Easy install, quick disconnect/connect makes it a snap... In a commercial setting this must be replaced once per year or failure will occur.

Fortunately it's cheap and easy to replace. The functionality of the faucet is worth it. This is not the right part..we are making it work I don't have the money to buy another one Moen 159560 Replacement Part KES I9180 Pull-Out Faucet Replacement Hose Extended Length 68-Inch OR 175CM Stainless Steel Interlock, Chrome Moen 131381 Pulldown Hose Moen 137028 Replacement Part See and discover other items: kitchen faucet replacement hose, moen faucetReplace old, worn-out parts to stop faucet water leaks. A kitchen faucet gets a lot of use. It gets used many times a day and many ways, such as to wash your dishes, get a drink, wash your food, and fill pots with water for cooking, just to name a few. Over time, the rubber washers and O-rings that create a watertight seal can deteriorate and cause the kitchen faucet to leak and puddle around the base. Disassembling the faucet and replacing the O-rings can stop your leaks and add years to your faucet. Shut off the water supply beneath the sink.

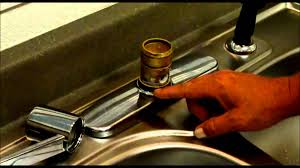
Turn the supply valve handles clockwise until tight. Loosen the set screw from the bottom of the faucet handle to release it using a hex key. Lift the handle off the faucet to expose the cap. Wrap the jaws of a pair of tongue-and-groove pliers in an old rag or masking tape to protect the faucet finish. Use the pliers to turn the cap counterclockwise to remove it. Removing the cap exposes the rotary ball and cam housing. Remove the cam housing and washer out of the faucet body and off the rotary ball. Lift the rotary ball from the faucet. Look inside the faucet for the seats and springs. These look like small black gaskets. Grab the seats with a pair of tweezers and carefully pull the seats and springs from the faucet. Make sure you look at exactly how the seats and springs install in the faucet body, so you can correctly install the replacements, otherwise the faucet may not work. Lift the faucet spout off the faucet to expose the body of the faucet and the O-ring. Use your fingers to peel the old O-ring from the faucet body.

Place a small amount of silicone based grease in the palm of your hand. Place the new O-ring in the grease and use your fingers to make sure the grease coats the O-ring. Place the new O-ring around the faucet body, making sure it sets in the groove on the faucet body where the original was installed. Slide the faucet spout back over the faucet body. Install new seats and springs inside the faucet. Replace the rotary ball. Place a new cam washer on top of the ball and replace the cam housing. Tighten the cap with the wrapped pliers. Set the handle on the cap and secure it with the set screw. Pry the beauty cap off the top of the faucet, exposing the screw beneath it. Remove the screw and pull the handle off the faucet assembly. Lift up on the faucet spout while twisting it back and forth to remove it from the faucet body. Use tongue-and-groove pliers to rotate the retaining ring counterclockwise to remove it and expose the retaining clip. Use needle-nose pliers to grab the clip and pull it from the faucet body.
Use your fingers to pull the O-ring from the bottom of the faucet body. Grab the top of the cartridge stem inside the faucet body with the tongue and groove pliers. Pull the stem from the faucet body. Pull the O-ring from the cartridge with your fingers. Clean the faucet parts under running water while you have the faucet disassembled. Squirt a small amount of silicone based grease in your hand. Place the replacement O-rings into the silicone grease and use your fingers to ensure the grease thoroughly coats the O-rings. Replace the O-ring around the cartridge. Install the cartridge in the faucet body. Replace the O-ring around the bottom of the faucet body. Replace the retaining clip and replace the retaining nut. Slip the faucet spout over the faucet body. Replace the faucet handle. Secure the handle with the screw you removed previously. Snap the cap back onto the top of the faucet. Check the faucet to ensure the hot and cold water is correct. If the flow of water is reversed, you must disassemble the faucet, pull the cartridge from the faucet, rotate it 180 degrees and reassemble the faucet.