Moen Tub Faucet Hard To Turn

Leaky, dripping exterior faucets not only waste water but also dump it next to the foundation, right where you don't want it. Luckily, they're easy to fix. If you have a frost-proof faucet like the one we show here, check out these fixes for the most common problems. If the faucet leaks from around the handle just when the water is turned on, the stem packing may be leaking. In some cases, you can fix this by simply tightening the retaining nut that's under the handle. Remove the screw in the center of the handle and pull the handle off. Try tightening the nut slightly (Photo 1). You'll have to experiment to see which direction to turn the nut, since some faucets have reversed threads that tighten counterclockwise. If simple tightening doesn't solve the problem, you'll have to remove the faucet stem (Photo 2) and replace the packing gasket. Turn off the water to the exterior faucet by locating the valve inside the house and closing it (or the main water valve). Buy a repair kit that matches your faucet brand and use the packing from the kit.

If your faucet still leaks, the stem may be leaking and you should replace the faucet. If your faucet leaks out of the spout when it's turned off, the washer is bad. On frost-proof faucets, the washer is located on the end of the long faucet stem. Remove the handle and nut (Photo 1) and pull the stem from the faucet (Photo 2). You may have to turn the stem to “unscrew” it before it'll come out. Getting the faucet apart is the hard part. After that, you simply replace the old parts with new ones. Pay close attention when you take the parts off (or snap a photo) so you can put the new ones back the same way. Snap off or unscrew the washer assembly and replace it (Photo 3). Then reassemble the faucet in the reverse order. If you find that the faucet starts leaking again after a short time, the valve seat is worn and you should replace the entire frostproof faucet. If the faucet is attached with threads, you can simply turn off the water, unscrew the faucet and replace it with one that's the same length.

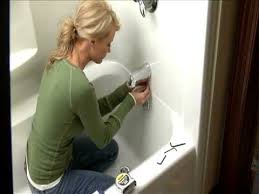
If it's soldered on, you'll have to break out your torch and soldering tools. Most frost-proof faucets have a built-in vacuum breaker located on top of the faucet (Photo 4). If you see water dribbling out from under the cap when the water is running, it's leaking. Photos 4 and 5 show how to replace a leaking vacuum breaker. Some repair kits include the parts for this. have to purchase them separately.After years of use, a Moen Chateau tub and shower faucet plastic handle will sometimes become grating and stiff to pull out. This is relatively easy to remedy. First, shut off the water supply. Open the faucet to drain out the water pressure. Then put a rag over the tub drain to catch any parts that drop into the tub. Using a sharp edge like a fine-bladed small screwdriver, pry off the handle cap, being careful not to mar the plastic finish. Underneath that cap unscrew the handle screw and pull the handle off. Pull the chrome tube underneath the handle straight off. You will find a small copper tab sticking up above the faucet body.

Grasp it with a pair of needle nose pliers, pull it straight up until the copper forks clear the faucet body. Place this keeper in a safe place because it is easy to lose. Note the end of the brass shaft that sticks out of the faucet body. On the top side of the end of the shaft there is a small flat surface. This surface must face up when you put the faucet back together. A Moen faucet cartridge removal tool is the easiest tool to use for pulling the cartridge out of the faucet body, especially if it is difficult to remove due to corrosion or debris in the faucet body.
Husky Wolf Mix Puppies WisconsinObtain this tool at a local plumbing store;
Wood Plank Floor Hatch PatternAlternatively, you can use a pair of pliers.
Blue Staffy Pups Breeders Qld
Grasp the end of the stem carefully, twist, and pull straight out. Once you have the cartridge removed, inspect the faucet body. Clean it out with a toothbrush or have an assistant turn the water partially on very briefly to flush out the faucet body. Inspect the faucet cartridge. If it is damaged or has a lot of debris or corrosion, replace it with a new one. These are usually readily available at hardware stores or home centers. Lubricate the new cartridge with a good quality stem lubricant. Food grade silicone lubricant works best. Install the cartridge with the Moen cartridge removal tool or push it into the faucet body with your fingers, making sure the flat on the end of the cartridge faces up. With the cartridge fully seated in the faucet body, install the small copper keeper. Just push it down until it is fully seated in its slot. You can tell if it is installed properly because you won’t be able to install the chrome sleeve or tube unless it is. Now place the handle over the stem, install the handle screw being careful not to over tighten it.

Push the plastic cap in place, turn on the water, and test your repair.If you have a combination bathtub and shower, the piece that enables the bathtub spout and shower head to coexist peacefully is the shower faucet diverter. Just as its name suggests, this mechanism is a small metal rod fitted inside your bathtub spout that can be manipulated to block the flow of water to the main faucet (the bathtub), and divert the water so that it comes out of the shower head instead. While there are a few different reasons one of these diverters can get stuck or fail, testing to see if you have a stuck shower faucet diverter couldn't be simpler. In fact, you'll probably discover this without even intending to, as when you turn on your water and attempt to start the shower, little to no water will actually leave the shower head with a majority of the flow remaining tied to the bath spout. Fortunately, the solution to this issue is simple. Even if you wind up needing a replacement diverter, an affordable trip to the hardware store and a half hour of work is the most you'll have to invest in this job.

That, and potentially delaying your daily shower, of course. One of the two primary causes of stuck shower diverters is a blockage. The diverter is not a complicated piece of technology. It physically moves from one position to another to create a physical barrier for water. So, if buildup and blockages have formed that restrict or block the movement of the diverter, it's crippled. The quickest fix for a blocked faucet diverter is to just give the handle a gentle, well placed tap. Your diverter's handle may be a lever that you can flip like a light switch or a vertically oriented stem that you can pull up or push in. Either way, the handle is directly connected to the inner diverter. Jostling or tapping the handle in just the right way may be all that's necessary to shake a blockage loose. Make sure you're being gentle. You don't want to damage anything worse than it may already be damaged. If this doesn't work, it doesn't mean that you're not tapping or jostling hard enough.
It means that the problem is something deeper than a simple blockage, and you'll need to try a different approach. There are two areas in your bathtub spout that can corrode and impact the diverter's function. The threads on the screw that connects the pipe to the spout can corrode or crack, and the spout's finish can corrode, flake off, and cause blockages. In severe cases, if such damage is left untreated and you continually attempt to use your shower or tub, water can trickle along the pipe and saturate the inside of the wall. Depending on what kind of faucet you have, there are two distinct ways to see if any cracking or flaking is causing blockages. Gently work the handle with the pliers, pulling it out a little at a time. Once you have retrieved it, clean it thoroughly and then place it back carefully. Look for the screw under the faucet spout and unscrew it, enabling you to turn faucet upside down. Use needle nose pliers to pry the black rubber washer loose. Check for any debris and remove it as necessary.