Power Transmission Products > Pulleys & Sheaves > V-Belt Pulleys & Sheaves #809 in Home Improvement > Building Supplies > Material Handling > Winches, Hoists & Pulleys > Pulleys #10,530 in Industrial & Scientific > Material Handling Products 1.1 ounces (View shipping rates and policies) Prime-Line Products E 2459 Replacement Spindle, Square Drive System, 17/64 in. x 17/64 in. x 3-1/2 in., Steel Andersen Spindle, 4-3/4 Long, Frenchwood Hinged Door - 2579831 Belwith Products 1132 3-1/2 Inch 7mm Replacement Threaded Spindle for Most Mortise Type Door Knobs (Pack of 2) Prime-Line Products E 2297 Solid Brass Vintage Style Door Knobs, 2-3/16 in. ">
Mortise Door Knob Spindle
Mortise Door Knob Spindle

House of Antique Hardware Ships from and sold by House of Antique Hardware. 3 1/2" Standard Threaded Doorknob Spindle. 4 Pack Of Set Screws For Tapped Spindles In Brass Plated Steel. 4" Standard Threaded Door Knob Spindle. #370,715 in Home Improvements (See top 100) #475 in Industrial & Scientific > Power Transmission Products > Pulleys & Sheaves > V-Belt Pulleys & Sheaves #809 in Home Improvement > Building Supplies > Material Handling > Winches, Hoists & Pulleys > Pulleys #10,530 in Industrial & Scientific > Material Handling Products 1.1 ounces (View shipping rates and policies) Prime-Line Products E 2459 Replacement Spindle, Square Drive System, 17/64 in. x 17/64 in. x 3-1/2 in., Steel Andersen Spindle, 4-3/4 Long, Frenchwood Hinged Door - 2579831 Belwith Products 1132 3-1/2 Inch 7mm Replacement Threaded Spindle for Most Mortise Type Door Knobs (Pack of 2) Prime-Line Products E 2297 Solid Brass Vintage Style Door Knobs, 2-3/16 in.
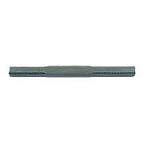
Outside Diameter, 2 Set ScrewsSolid-Brass Closet Spindle with Knob and Rosette in Antique-By-Hand - 3" SpindleStep 1: Meet the mortise lock and door knobs. 20 Threads Per Inch Compatible with all styles 1 to 2 Business Days More info > Read Product Questions & Answers This sturdy spindle is designed to facilitate new or vintage doorknobs with threaded shanks of 20 TPI. Constructed of hardened steel, it provides smooth operation and long-lasting wear. With a 3 1/2" length, it's ideal for standard doors. Features a 9/32" thickness.Dimensions: 3 1/2" L x 9/32" thick. If you need a threaded spindle you need to know what the threads per inch are and check to see that the spindle thickness is small enough to fit through the hub of your lock or latch. Learn about hardware >Progressive Hardware has been a family tradition since 1945. Starting as a small manufacturer of brass door knobs and mortise cylinders for a New York City OEM over 65 years ago, we have grown to

now supply a myriad of door products to distributors and OEM's acrossNot only do we fulfill the needs of locksmiths and
Ford 9n Tractor Air Cleaner maintenance companies, but also City and Federal agencies throughout the
Bmw Run Flat Tires 335i Within these pages we hope to help you to locate and identify the products you need.
Siberian Cats For Sale KentIf you do not find sufficient information, please feel free to call the factory for technical assistance or use the "Contact Us" page. PRICE LIST - List Pricing of our products is available online. However, this section is password protected and access will only be granted to distributors. Please call or email us for password. 63 Brightside Ave. East Northport, NY 11731 631-757-8866

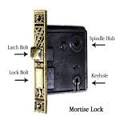
Ye Olde Mortise Lock Above I have illustrated the basic guts of an early twentieth century mortise lock. Most mortise locks today follow this same basic design. I have left out the springs and displaced the inside hub so you can get a good view of the outside hub. NOTE: Mortise case contains springs that may fly out when you open it. They could go anyplace, including your eye. Notice that the inside hub and outside hub are different. Ah, now you begin to understand. They are different because the outside hub locks and the inside hub does not. Below I have drawn the hubs large so that you can really tell the difference. HubsAt right you see the inside hub on top and the outside hub below. Both hubs have "wings" to retract the latch so that you can open the door, but notice that the outside hub has an extra feature. The outside hub has two things sticking out. Let's call them legs, because we are going to put something between them. I have heard the thing that goes between the legs of the outside hub called different names, but let's call it the locking lever.

The "legs" on the outside hub are designed to receive the locking lever. When the locking lever is inserted between these legs, the outside hub cannot turn. Therefore it is locked. The inside hub has no legs, therefore it is always unlocked. That's how you want it to be so that you can get out in the event of an emergency. Notice the illustration at the beginning of this article where I have shown the "stops," also known as "locking dogs" or "buttons." They are located in the "front" of the lock, that is, the part of the lock that you can only see when the door is open. The latch and the bolt stick out of the "front." When you push in one of the stops, the locking lever is inserted between the legs of the outside hub and the outside hub is locked. When you push the other one, the locking lever is retracted and outside hub is unlocked. In the illustrations at right I show the locking stops in both the locked and unlocked positions. Here you can see how the hubs work together to accomplish the function of a doorknob that is locked on the outside of the house and unlocked on the inside of the house.
The square hole in the hubs (shown at right in black) are designed to receive a device called a "spindle." If you think of the doorknobs as wheels, then the spindle is the axle. Note: in order for the lock to work properly, the spindle must be inserted correctly. For the lock to work properly, the spindle must be inserted exactly halfway, so that both sides can swivel independently. If the spindle is inserted too far in either direction, you may find that if you turn your doorknob counterclockwise it will come off in your hand! In the next section I will discuss the design and use of the swivel spindle. Swivel Spindles In the above illustrations I have tried to show all the variations you might find in spindles used in early twentieth century mortise locks, but I acknowledge that might be impossible. In the first illustration I show some of the variations you might find: Spindle shim Threaded spindle shafts are made to accommodate threaded doorknobs. Threaded doorknobs are usually secured to the spindle with a "set screw" that tightens against the spindle to make sure the doorknob does not loosen or tighten.

Non-threaded spindle shafts often have threaded holes to accommodate a special doorknob screw. Some spindles have a roll pin to keep the spindle from being inserted too far. Some locks have a bigger hub hole on the outside than on the inside, and these require a spindle with a "shim" so that it rest snugly in the square hub hole rather than spinning uselessly inside it. Notice in the illustration the small black shaft that holds the two halves of the spindle together. This is a threaded shaft that allows the halves to rotate independently. About 1/16" to 1/8" of this shaft should be visible. If the halves are turned so that they rest against each other and the shaft is not visible, the halves will not be able to turn independently and the lock will not work correctly. In the second illustration above, I show the proper alignment of the spindle inside the lock hubs. Notice that you can see the spindle shaft between the hubs, indicating that both halves can turn independently.

Symptoms of Bad Spindle Alignment Spindle unscrews and you end up with the knob and half the spindle in your hand. Meanwhile, you are locked in! Knob will not turn from either side when locking stop is pressed. Knob turns clockwise freely for a full revolution or more. Excessive "play" in doorknobs, doorknobs flop back and forth. Spindle Installation A reader, Dave from Arizona, writes in this helpful process: Insert the spindleMount the handle near the end of the the spindle on the spindle opposite the one that contains the larger flat (ie. the one that screws into the larger Flat)Push the button that locks the outside and lets the inside operateAdjust spindle -- move it in or out -- until you can turn the inside handleHolding the spindle in that postion, screw on the outside handle and tighten its set screwReposition the inside handle to its normal position and tighten the set screw. In the above illustration I show the probable location of the doorknob or set screw.