Replacing Shower Drain Flange

Replace a shower drain without tearing open the ceiling below. Use a special drain assembly and install it from the top. How to replace a shower drain from the topBuy Wingtite Shower DrainWingtite Support Products Click here to download PDF See how it works, click to watch the video Recommended Tools and Materials We Sell Adapters for the Pipe Sizes Below. To Order Call 800-200-2678. Inside Bushingfor 2” ABS / PVC Removing Drain Seal - 2 Part System (Threaded Nut & Gasket Type) Removing Drain Seal - 3 Part System (AB&A Sure Fit) Removal of Drain Body WingTite Technical Support: 805-927-1753. Available Weekdays 10 A.M. - 4 P.M. (PST).Learn how to install a bathtub drain flange Click here for larger image Drain shoeUnderneath the tub drain flange will be a good amount of plumber's putty that seals the inside of the tub drain, and a rubber gasket underneath the tub that seals the drain flange to the tub. The Drain Key Tub Drain Removal Tool or Smart Dumbell Tub Drain Removal Tool

Screw Driver (may be needed to remove the stopper) There are a few different kinds of drain stoppers, all of which can be removed very easily. When you remove your old stopper you may pull up hair and/or other debris, so be sure to have a container or bucket handy to place your old dirty parts into since this can get messy. For more information on how to remove your stopper, click here! To remove the tub's drain flange it is best to use a drain removal tool. The Drain Key or Smart Dumbell are designed specifically for this job. Using these tools helps to prevent any potential damage to the tub's enamel/finish. There are other ways to remove the drain flange, however those methods are likely to damage your tub (or your tools!). Step 1: Insert the Drain Key or the Smart Dumbell into the drain. Step 2: Following the instructions for the tool, turn counterclockwise. Step 3: Keep turning drain counterclockwise until the old drain is released. Step 4: Clean drain area, making sure to remove all old putty residue.

Allow to dry before installing new drain. Both the Drain Key and the Smart Dumbell essentially work the same; you insert them into the drain and turn counterclockwise to release the old tub drain. However, they are slightly different. Get more information on how these tools work and how to use them, here. Find out how to install your new drain here! Complete Waste and Overflow kits Bathtub Drains and Part Easy to Use Drain Tools
West Elm Curtain Rod Assembly Clawfoot Tub Supplies & Drains
Used Furniture For Sale In Grand Forks Nd Please note the information provided is intended to provide a basic knowledge of plumbing related repairs.
38 X 64 Faux Wood BlindsThis information is general and may not suit all applications.

If you are at all unsure of your abilities to complete one of these projects, please consult a professional.Shower drains can leak over time. The drain that we see in the middle of the shower floor is actually a collection of parts designed to provide a leak-proof method of funneling water from the shower and into the home's waste plumbing. Although drains provide years of trouble-free service, over time the rubber or fiber gaskets that help seal water dry out and cause leaks. The easiest way to replace a drain is while the shower base is removed from the shower stall and the bottom side of the shower base can be accessed. Sometimes, the base can be accessed through the ceiling from the floor below. Using a screwdriver, if needed, remove the strainer atop the drain. Loosen the drain body locking wring from the underside of the shower pan. Remove the ring, then pry the drain body off the 2-inch shower waste pipe. Clean the top and bottom surfaces of the shower pan to remove old putty, rubber, caulking or fibrous material.
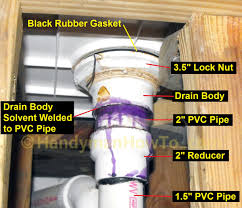
Remove the locking ring, strainer and all washers and gaskets from the new drain assembly and lay them out on a work table in the order shown in the installation instructions that came with the kit. Roll some plumber's putty in your hands until it is soft and pliable, then apply it to the underside of the drain body flange. Insert the drain body through the hole in the shower pan. Install the drain body plastic washer and locknut from the underside of the pan and tighten. Remove excess plumber's putty that squeezes out. Insert the rubber into the drain body, ensuring it goes around the 2-inch waste pipe in the center of the drain without twisting or tearing. Screw the caulking nut into the drain body and tighten it using the supplied flat tool and screwdriver. The caulking nut squeezes down on the rubber washer and creates a water-tight seal. Install the new strainer onto the drain body, either by snapping it into place or with the supplied screws, depending on the model. Things You Will Need Screw driver Basin wrench Adjustable pliers Putty knife New drain assembly Plumber's putty Silicone sealant Caulking gun Tip Warning References YouTube: Shower Base Install and Connect Drain InstallAquarius Products: Shower Drain Assembly Installation Instructions Photo Credits Jupiterimages/Comstock/Getty Images Suggest a Correction

Linear Drain GuideWhether it is a barrier threshold (curb), or barrier free (curbless/zero threshold) installation, Infinity Drain has provided general guidelines below to assist in determining the correct product choice for your project. Site Conditions Locating Linear Drains Center Drain Linear Drain Type of Install Fig 1: Wall-to-Wall Fig 2: NOT Wall-to-Wall Fig 3: Against a Wall Fig 4: Threshold Install Fig 5: Threshold Install Fig 6: Center Pitch Install Wall-to-Wall (Fig 1) Against a Wall (Fig 3) Curb or Curbless (Fig 3, 4, and 5) Threshold Installation (Fig 4 and 5) Barrier Free Installation (Fig 4 and 5) Center Pitch Installation (Fig 6) Infinity Drain Series that are NOT recommended for Threshold Installation: S-AG 38 S-DG 38 S-TIFAS 65 S-TIF 65 S-TIFAS 99 FXTIF 65 FFED 25 FFDG 25 FFAS 25 FFTIF 65 FTED 25 FTDG 25 FTAS 25 FTTIF 65 Flow Rates Variables to Consider Infinity Drain products that achieve a higher flow rate without adding a second outlet S-DGAS 99 FX 125 STIF AS 99 FF 125 S-AS 99 TD 20-3 Outlets Waterproofing Common Methods Using a Clamp Down Floor Drain PVC Membrane/Vinyl Liner (Polyvinyl Chloride) Lead Pan/Copper