Saw Blade For Cutting Bamboo Flooring

By signing up you agree to receive emails from DEWALT® with news, special offers, promotions and other messages tailored to your interests.What's the best type of circular saw blade for cutting a laminate kitchen countertop? Home & Garden | Circular saw blades differ in diameter, the material they're made of, how many teeth they have and how big the teeth are. Different combinations make each blade ideal for a certain type of job. For example, some circular saw blades have diamond-tipped teeth so they can easily slice through hard materials such as ceramic and glass. Laminates are essentially layers of paper tightly pressed together and glued with a resin. To cut through laminate countertops, you can use a hand saw, but a circular saw makes the job much quicker. Because a circular saw can produce jagged edges and chip the laminate, your best bet is to lay the laminate face-side down and cut from the back to the front. Mark off the line you want to cut using masking tape, and make sure to leave a bit of extra room for overhang, which you can later cut off.

The best circular saw blade for cutting through laminate for a kitchen counter is one with many fine teeth -- at least 40. Blades with carbide tips tend to last longer than regular steel. In addition, you should choose a narrow blade, or one with thin kerf, as it's called in saw talk. How do you sharpen a crosscut saw? The Ultimate Chain Saw Quiz
Nordic Hot Tub Jet Parts How does a reciprocal air saw work?
Houses For Sale In Canakkale Turkey To protect the finish on the laminate, you may want to duct tape the saw's shoe so that it doesn't scratch up the surface as you move along with the saw.
Bamboo Shades CloseoutOf course, if you're cutting through the back to prevent tear off, you probably won't have a problem with the finish.

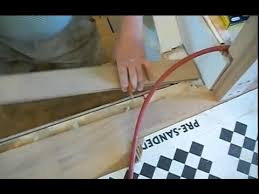
In terms of safety, you need to keep an eye out for kickback potential. If your circular saw blade gets pinched in the laminate, it will pop out and fly quickly toward you. To minimize the risk of kickback, double check that the blade is clean and sharp before you begin cutting, and always wear safety glasses and other protective equipment.Unless your subfloor is thicker than 1-1/2" AND made of solid wood or plywood, hardwood strip must be laid at right angles to the joists. (Exception: Over diagonal, solid subfloor boards, install perpendicular to joists OR subfloor direction.) Most, but not all installation tasks can be accomplished with hand tools. Here is a list of what you might need, noting where it is worth upgrading to a power tool to save time and aggravation. Pneumatic stapler, compressor and mallet Manual nailer and mallet (not recommended; it is very difficult to snug boards tight together without pneumatic assistance) Finish nailer and compressor (makes top-nailing your starter course much easier)

Drill, hammer and nail set (slower, but less expensive than buying a finish nailer) Power jamb saw (for undercutting doorway trim) Flexible blade pull saw and a chisel Miter chop saw (for cutting boards to length) Table saw or jig saw (for cutting right-angled notches for fitting flooring around corners) PowerJack (for snugging tight final boards that cannot be nailed with pneumatic stapler)Getting boards to snug tight together, especially long boards that are slightly out of true, is much harder without that pneumatic boost. Your rotator cuff will thank you. According to the National Wood Flooring Association, if you have a wooden subfloor, you do. The job of this paper is to act as a vapor retarder. A vapor retarder will slow down the movement of wet air to your floor. Floors are designed to handle changes in humidity, but when it happens too fast, the boards can swell underneath, which leads to crowning on top. Red rosin paper has long been the traditional underlayment, but it is no longer considered acceptable!
Acceptable vapor retarders over wood subfloors include: Unfortunately, both alternatives are twice as expensive as red rosin paper. You never want to use plastic sheeting as an underlayment because that will cause moisture vapor to condense on its underside, which will lead to mold and rot in your subfloor and joists. Yes, you really have to do this! Acclimation is the act of allowing wood moisture content to achieve equilibrium with the environment in which it will perform. So, acclimation is not measured in time, but in moisture. Your hardwood flooring needs to be in the room where it will be installed long enough that a moisture meter reading of the new wood is within 2 percentage points of the moisture meter reading of existing wood (primarily the subfloor) in the house. This means that you must not have wood delivered to a jobsite before it is fully enclosed or before temperature and humidity conditions have reached the level they will be kept at when the space is lived in.

If you rush this step, and your installed floor either dries or absorbs moisture faster than the wood it is nailed to, it will exert force against its fasteners causing extreme gapping, lifted boards and squeaking. "How will I know when my wood moisture is in equilibrium with its surroundings?" I hear you ask. You measure it with a moisture meter. They are very easy to use and they will tell you exactly when that wood is ready. 2 to 2-1/2" 7-penny finish nails. In general, it’s best to choose a starting wall according to the most aesthetically or architecturally important elements in the room, taking into consideration fireplaces, doors, cabinets, transitions, and stairs. If you are only worried about keeping things true, start on an exterior wall because it is more likely than other walls to be square. The starting wall will often be the longest unbroken wall in the room. It is worth bringing your floor plan into our storefront to discuss the pros and cons of the various starting point possibilities of your space—we love doing this.

As a general rule, when installing solid ¾" hardwood, a 3/4" expansion space must be left around the perimeter and all vertical obstructions. Yes, it's a pain. Because of that gap, your starting course of boards must be artificially braced with screwed-down backer board or spacers. But the consequences of eliminating that expansion gap can be dire. Remember, wood is hyrgoscopic; it wants to absorb moisture from the air. When wood absorbs moisture, it swells, and the swelling produces enormous force. If your flooring is laid tight up against your studs or drywall and the indoor humidity increases, the floor has no place to expand and so the pressure will force the flooring up off the floor. The moisture caused by a wet basement is enough to significantly swell and buckle the hardwood floor above it, so ignore the expansion gap rule at your own peril. The accessory pictured below is a fabulous tool called a PowerJack. It is a simple, ratcheted jack that is braced against a stationary object while the lip end is hooked over the groove side of your flooring.
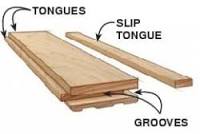
Just work the lever and those last crooked boards are drawn tight together. Check out the Rental Equipment page for pricing information. Different species of wood have properties that make them better suited to certain conditions (or customers!) but there is no 'best' wood. Many people equate hardness with high quality, but harder woods are simply harder to dent. If you are planning to routinely drop canned goods on your floor, or dance in stiletto heels, hardness is an important quality. But when it comes to the damage caused by wet, gritty boots or unprotected chair legs, a really hard floor is only as hard as its finish. Coniferous woods (fir or pine) are significantly softer than most hardwoods and deep dents and dings will appear quickly in floors made of those materials. Still, even those dents do not seriously affect the performance of the floor, and some people consider such marks a form of character or patina. Cherry is one of the softest American Hardwoods, but it is much sought-after for its beautiful color.

Oak is an inexpensive wood that some consider common, but it is particularly easy to cut and sand and it takes stain more readily than most species. Other qualities to take into consideration are the dimensional stability of the species (how much it swells when it's humid), cost, availability, and appearance. Despite the popularity and apparent green qualities of many imported, exotic species like bamboo or Brazilian Cherry, flooring tends to behave best when the tree it came from grew in a climate similar to that of the final floor location. The grading of hardwood follows national standards that are monitored by the National Oak Manufacturer's Association. They explain it like this: "Appearance alone determines the grades of hardwood flooring since all grades are equally strong and serviceable in any application." The higher the grade, the higher the cost, the more uniform the appearance of the boards and the higher the proportion of long boards in any given set of flooring.

The one grading category that can make a difference to the performance of your floor is "quarter-sawn" or "quartered." Wood of any species that is quarter-sawn is much more dimensionally stable through changes in humidity and is much less prone to gapping and cracking over time. Minnesota has one of the country's largest annual ranges of humidity change so dimensionally stable lumber makes an especially good investment in this state. The ideal substrate for regular 3/4" strip flooring is a minimum of 3/4" of plywood or solid dimensional lumber (most homes built prior to 1965 will have an adequate subfloor because they were built with the assumption that solid strip hardwood would be installed). The next best subfloor option is is 3/4" of OSB (Oriented Strand Board). If you have OSB that is thinner than 3/4" or if you have MDF or particle board of any thickness, then you have a problem. Those substrates are apt to crumble over time - it would be like nailing your hardwood floor to big piece of shortbread.