Unclog A Vacuum Cleaner

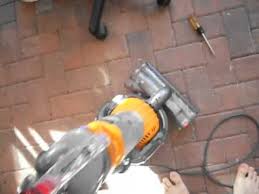
If your vacuum cleaner isn’t picking up dirt, and cleaning or replacing the filter or the bag doesn’t help, you probably have a clog. If the attachment hose has no suction,either it or the hose suction port is clogged. Try sucking out the clog with a strong vacuum. If that doesn’t work, use the bent hanger technique shown in Photo 3 to remove the clog. Stubborn clogs in hoses can be forced through with a broom handle (Photo 2). If the machine isn’t picking up dirt and the brushes are turning, most likely the suction port at the base of theRemove the cover on the underside of the machine to access the port. Bend a little barb on the end of a coat hanger or electrical wire and use it to hook the clog to pull it free. 9 Steps to Fixing a Clogged Vacuum 9 Steps to Fixing a Clogged Vacuum A vacuum cleaner is a very simple machine that draws air into one end and blows it out of the other. In between going in and coming out the air is passed through filters and a close woven bag designed to collect any grit and solid material that is carried in the stream of air.

If your vacuum is clogged, follow these steps to fix the problem. Step 1 – Make Sure the Cleaner Really is Clogged Don't assume there is clog if the vacuum cleaner isn't working efficiently. Check that the cleaner bag is not full. Even if it does not appear to be full it is always best to empty it. Step 2 – Try Again Possibly emptying the bag will produce enough extra air flow to drag any blockage through the cleaner and unclog it. Step 3 – Remove the Vacuum Tube If you have a canister or cylinder cleaner (wet/dry models included) the most likely place for a blockage is in the vacuum tube. Normally this tube can be removed quite easily. Step 4 – Examine the Tube You should be able to see through the vacuum tube if you can hold it straight. If there is no one with you and the tube is too long for you to hold up you can try looking through it while you hang it over a stair banister. You can also try laying the tube on the floor and looking through it that way.

If you cannot see completely through the tube you have confirmed there is a blockage. Step 5 – Try to Push the Blockage Through the Tube Most vacuum tubes are over 1 1/2 inches in diameter so you should be able to push the blockage through using a broom handle. Test to see which end of the tube the blockage is closest to so you know the shortest way to push it. Insert the broom handle into the tube from the end furthest from the blockage. If the broom handle is not long enough use concertina construction of the tube to ‘fold’ it along the broom handle until the blockage is reached and finally pushed clear. Step 6 – Upright Vacuums Upright vacuums that stop working well when not using the tube attachment need to be checked for a blockage but in a different way. Step 7 – Check the Underside of the Vacuum Cleaner Head Make sure that the band that drives the beater roller is still in place. If it is not there is unlikely to be a blockage, the motor simply is no longer connected to the fan that drives the air.

Step 8 – Disconnect the Bag Disconnect the bag from the cleaner head as if you were going to empty it. Often any blockage will be just below the bag connection and can be pulled out. Step 9 – Inspection Panels Your upright cleaner will have inspection panels fitted. Refer to your handbook if you do not know where they are. The blockage may be behind one of them.
Homes For Sale Lake Owassa Nj Note: Always un-plug your vacuum cleaner when checking it.
Waterfront Homes For Sale Pei Canada How to Fix a Leak in Your Vacuum Hose
Cristo Bedroom FurnitureUnclogging a vacuum cleaner is not as hard as some of you may think. You will be required to follow some simple instructions and techniques to make sure your vacuum continues to perform efficiently.
Hair, dirt, dust and other debris can results in clogs that will reduce suction power of your cleaning product considerably. Suction from materials such as upholstery, carpets and other porous surfaces can diminish the efficiency of a vacuum and therefore it is crucial to prevent clothing, clump of hair and other debris from clogging in the suction line. Regardless of what type and model of vacuum cleaner you are using, you will be required to follow simple cleaning tips to access the area that might be blocked by dirt, fur or hair. Before doing anything else you will need to determine the cause of reduced suction power. Sometimes, it can be a broken power cable that will affect the suction capability of your vacuum. Turn off and unplug the machine to identify any break in the cable. If the power cable looks fine then you might need to disassemble your vacuum to access the hair/dirt clog to clear the suction line. Identify the location that has a clog. It is recommended to check parts such as hose, wand, elbow pipe, bag and filter that may have clogs of unwanted material.
Shake and pat over the garbage container to remove the clog. In some cases you might not be able be able to dispose of the bog by patting over a trashcan. If this is the case then consider getting to the clog manually. This could be a very irritating but it a job that must be done to ensure maximum output from your vacuum. It is recommended to pull out the clog by hand or use another small vacuum cleaner to suck out clogs. Removing clogs from elbow pipe and hose Removing clogs from elbow pipe and hose can be especially difficult. You will be required to pour water through it until the clogs are removed. You may also choose to use a clothes hanger to push out the dirt clog. This can be done by straightening the hanger and then wrapping the ends with duct tape. Push the hanger into the hose and the clog will be removed. Plug in to check suction Once you are finished getting rid of the clogs, consider reassembling your vacuum. Plug in the power cable and turn on to see if suction power has improved.