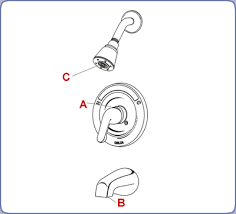
Delta Faucet Stopper Repair
Lincoln Products helps you expand your opportunities, diversify offerings in the plumbing category, and compete for profitable remodeling business.Looking to find plumbers in your area? Get free quotes » If you’re like most homeowners and have resigned yourself to a poorly working stopper in your bathroom sink, you’ll be amazed to see how easy it is to fix. Once you understand the basic system, you’ll become master of your lavatory and will never again have to live with a sink that won’t hold water or, if you have the other common problem, a sink that takes forever to drain. How a Sink Stopper WorksGot your flashlight? Now clear out the vanity under the sink so you can get a good look at the rear, underside of the sink and the faucet. The stopper handle (or knob) at the back of the sink is connected to a vertical metal rod. When you push down or pull up the handle, the handle rod moves a horizontal pivot rod below. The pivot rod actually runs through the wall of the sink’s drainpipe and is connected there by a special retaining nut that keeps the joint watertight.

Inside the pipe, the pivot rod is inserted into a loop or hook on the bottom end of the stopper. The handle and its rod make the pivot rod move like a see-saw to lift or lower the stopper at your command.Adjusting the Stopper LevelIf your sink won’t hold water, chances are the stopper isn’t seating securely over the drain hole, or there could be leakage due to a bad stopper gasket.
Pirelli Tyres Prices PakistanIf the sink won’t drain quickly, the stopper either isn’t opening far enough or the drain is partially clogged.
Puppies For Adoption Quad CitiesFor the first problem in both cases, adjusting the stopper level is the first thing to try: Under the sink, locate where the rear end of the pivot rod attaches to the vertical rod of the stopper handle.
Pegasus Toilet Repair Parts
There should be a flat, metal bar with several holes in it (called a clevis), or the rods may connect to each other with an adjustable fitting or clamp.To make the stopper rise up higher when open, squeeze the bendable clip holding the pivot rod to the clevis, then slip out the pivot rod and move it down a hole or two on the clevis. To make the stopper close more tightly, move the pivot rod up a hole or two on the clevis. If there’s no clevis, simply loosen the fitting or clamp joining the rods and move the pivot rod up or down on the handle rod as applicable. Fine-tuning this adjustment often takes a little trial and error. If this hasn’t solved your problem, it’s time to remove (and possibly replace) the stopper.Removing (and Replacing) the StopperTo remove the stopper, make sure the sink is empty, then loosen the retaining nut securing the pivot rod to the drain pipe, using slip-joint or standard pliers. Unscrew the nut all the way, then slowly pull the pivot rod backward while lifting up on the stopper.

Once the stopper is free, you can return the pivot rod to its normal position.If the stopper and/or drain are gunked-up with hair, etc., clean them, then reinstall the stopper by reversing the removal steps. Note: Tighten the pivot rod’s retaining nut (or cover the hole in the drain pipe, if you removed the rod) before running water in the sink.If the rubber gasket on the underside of the stopper top is cracked or funky, replace the stopper (or you can try to find a new gasket, if you can’t find a stopper with the right finish). Replacement stoppers are commonly sold at home centers and hardware stores.When everything is back in place, and you’re sure the stopper is captured by the pivot rod, tighten the pivot rod’s retaining nut so it’s snug enough to be watertight, but do not overtighten, which can hinder the pivot action. Run the water and check for leaking around the nut. Looking to find plumbers in your area?The following support information is available for this model:

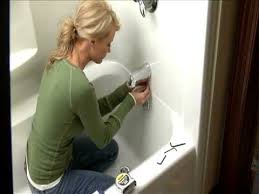
Plumbing Home Repair - DIY Plumbing DIY Electrical Home Repair Heating & Cooling Repair - DIY HVAC Repair DIY Interior Home Repairs DIY Exterior Home Repair Glossary of DIY Home Repair and Tool Terms DIY Home Repair Tool Descriptions and Photos How to Select a Contractor - Tutorial on Selecting and Working with a Repair Contractor DIY Home Safety Tips Appliance Home Repair: DIY Tips and Step-By-Step Guides Added on: June 7, 2011 You already love Spotify, but do you know how to get the most out of it? Click here to learn all the Spotify Tips and Tricks you never knew existed. Learning how to do a few simple home plumbing repairs can save you a ton of money. In this video, master plumber Tim Flynn shows you how to fix a leaky ceramic faucet. "I'm Tim Flynn and I'm the owner of Winters Plumbing and Heating in Cambridge, Massachusetts. Winters Company offers plumbing, heating, cooling. If you need service today; we're the business to call.

I'll be talking to you today about plumbing. How to fix a ceramic faucet with a ceramic disk replacement cartridge. Kitchen sink faucet, pretty standard, we have one here, a pull-out spray, most houses have them now. Just for the sake of time, I've already shut the water off to this faucet, so the first thing to do is test it to make sure that the water is off. Test the hot, and test the cold. With this faucet, what we're looking to do is change the ceramic disk, which is going to be underneath the handle, and so I'm going to walk you through that process right now. So you want to take the spout, turn it off to the side, take the handle, lift it straight up. This nut right here, we're looking to take this handle off, some faucets have an allen-wrench set screw in the back, some faucets just pull straight off, this one here has a little decorative red and blue rubber stopper, and if you take it out with your fingers, set it off to the side. So, in order to take this handle off, you have to use a very small allen-wrench.
This allen-wrench size is about 1/8th of an inch, and you insert it into that hole, back off the screw, not all the way, you don't need to, and it lifts off, set it off to the side. Now you're going to see this little plastic piece, this is decorative. This little decorative piece, you don't want to put a tool on, its usually just hand-tight, get a good grip, back it off. Now there's a glass piece that holds in this cartridge, sits right on top. So you want to take your time and you want to back off this brass piece, and you want to use your channel locks (xx xx xx) and you want to back it out. Then set your hardware off to the side, now the cartridges will move straight up. Take notice that the cartridge has a couple of little plastic protrusions in the back. This little red piece, these are the O-rings, this is usually what leaks, and if it does, quite simply you just take a ceramic cartridge and you put a new one in. We happen to have one ready to go, so, this ceramic cartridge goes right back in the same way it came out, and we're looking to line up these little protrusions in the back of the faucet.