Delta Touch Faucet Will Not Turn Off

As part of last year’s renovation, we redid our kitchen, which means a new sink and faucet. We traded up from an overmount single-bowl sink to an undermount double-bowl sink, both aspects of which we’d long wanted. There was one thing we had to fight a bit to get, though, which was a garbage disposal for each sink bowl. The plumber didn’t want to do it on ground of it adding weight to the sink. Our response was, in effect: “We’ll have the sink remounted in ten years if necessary, but put in two disposals.” So he did, and we’re really glad. The replacement faucet, however, does not make us nearly as glad. We decided to get a touch-activated faucet, settling on a Delta Addison single-handle faucet. The touch activation was because many are the times we want to wash off hands that have just handled raw meat, and being able to touch-on the faucet with a forearm seemed like a great idea—and it is! The problem is that nearly the entire faucet body, including the temperature/flow adjustment handle, is touch-sensitive.

The exception is the pull-out head, which is inert. Thus, if you reach past the faucet and brush it by mistake, the water starts flowing. This is true even if you bump the base of the faucet, which is annoying when you’re trying to wipe down the countertop around the faucet. Even worse, changing the temperature or flow rate means using the touch-sensitive handle. There’s evidently logic built into the faucet that’s meant to prevent the water from cutting off if you adjust the handle, but it only works about half the time. So sometimes you make an adjustment and the flow cuts off, and sometimes it doesn’t. Frankly, the inconsistency is more maddening than the unwanted cutoffs. For example, I’ve developed an expectation that the flow will cut off after I use the handle. So I’ll adjust and then immediately tap the faucet again so it cuts off and then comes back on tap. Except if it didn’t cut off, then my tap cuts it off before I can stop the impulse and then I have to tap again.

Of course, any touch-sensitive faucet is a total luxury, and fortunately it’s easy to disable the touch feature—all we have to do is pull the batteries from the battery pack and it becomes a regular faucet. The drawback there is that there are definitely times when you want to be able to turn on the water flow without smearing whatever’s all over your hands on the faucet. (And with three kids, one of which is an infant, there are some things you definitely want to avoid smearing.)
Graco Car Seat Anchor The really incredible part is that these problems would be completely solved if only the neck of the faucet were touch-sensitive.
House For Sale Earl Street Kingston OntarioIf the base, which is a separate part from the neck, and the adjustment handle were inert, easily 90% of our frustration would just vanish.
Black Lab Puppies Erie Pa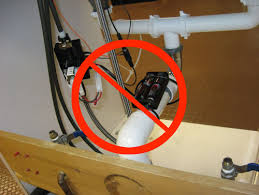
We could start the water flow by touching the neck and not worry about weirdness with the adjustment handle or when brushing the base. If you’re thinking of installing a touch-sensitive faucet, I can’t recommend this one, unless of course a future version of it fixes the problems plaguing this one. And I have no idea if there’s a better touch faucet on the market; for all I know, they’re all like this. Definitely do your homework, and if at all possible play with a functioning model before taking the plunge. The touch feature doesn’t add a ton to the price of the base faucet, but it’s enough to be annoying when you’re seriously considering disabling it. @DeltaFaucetCAN Our Touch2O and Touch2O.xt Technology faucets are a great addition to your Universal Design bathroom. Precisely in tune with Every Touch Experience the precise control of Delta® Touch2O Technology. Simply tap anywhere on the spout or handle of the faucet with your hand, wrist or forearm to start and stop the flow of water.

Are you ready to get messy? Create your own finger painting or upload a photo and add paint to it, then use the Touch2O faucet to rinse the paint away.2O®This post is a long time coming. Almost two years, in fact, since I was invited to visit the Delta Faucet Headquarters with a bunch of awesome bloggers, and decided I was totally having one of these Delta Touch2O faucets in my future kitchen. At the time I expected that future kitchen to be in a whole other house, in a different part of the state. But hey, things happen. So my Touch (donated by the awesome folks at Delta) sat forlornly in its box, collecting dust, waiting for the day when I would unexpectedly buy a house while sitting in a bar. Luckily that day came sooner than anyone could have anticipated, and the next thing you know, I’m wedged under a sink, installing this baby. That looks like a lot of parts, but don’t be intimidated. It was infinitely more difficult to remove the old faucet (there was a hammer involved) than to install the new one.

I think it took less than 30 minutes, and here’s how it went down. The old faucet was a 4-hole model with one for the faucet, one for the handle, one for the sprayer, and one for the soap dispensers. (Side note, soap dispensers inexplicably gross me out.) Since the Touch only needed two holes, I had to decide where I wanted the faucet and handle located. Then I started with the installation, following the instructions. 1.) Wire comes out of spout shank. 2.) Metal washer and spout insulating element get snapped together. 3.) Dry fit assembly. The spout and white gasket on top of the “counter”, the large mounting bracket (used for top mount sinks only) washer and insulator, and nut to be attached from underneath. Here’s what it looks like from under the sink: And that part is done. 4.) Gasket goes around the valve with 101 wires and tubes coming out of it. 5.) Tubes and wires are fed through the proper hole and the the valve (aka handle) is secured with the mounting bracket.

It comes with a wrench to do the job, or you can use one of your own. 6.) This fancy thing is called a solenoid, and the metal part is the retaining clip. Of the tubes and wires that are attached to the valve, the two long ones go to the hot and cold water supply lines, the wires attach to the side of the solenoid (we’ll get there in a sec) and the solenoid itself is attached to the “short tube”. It slides right over the top and is held securely by sliding the retaining clip in place. 7.) Install the hose by sliding the hose guide on the leading end of the hose. Thread the hose through the spout. You might have to give it a little jiggle or two at the end. Dock it in place. (The secret is magnets!) 8.) Attach the other end of the hose to the bottom of the solenoid by pushing it in place. Snap the clip over it to secure. 9.) And for the fun part… wires! (It’s not that bad.) Attach the ground clip to the bottom of the spout. Pull the protective cap of the wire from the shank (it looks like headpones) and plug it into the jack on the side of the solenoid.

Snap the battery wire on to the battery pack. Note: Follow the actual directions and install the batteries after the wire is attached. The world didn’t stop turning on its axis, but those batteries quit working like eight hours later. It could be because they sat in the box for two years, or it could be karma for not following the directions. 10.) Install check valves onto water supply lines. They have little pieces that go inside them… don’t forget those. Also this is the one spot where I chose to use teflon tape. 11.) Install hoses onto check valves. One thing I love about all delta faucets is that the pex tubing runs all the way through the faucet to the supply line, which means you don’t have to attach the hoses both at the supply lines and up on the faucet (which is a pain in the ass) like with most other manufacturers. For this reason alone I’d only install Delta faucets. 12.) Then, it’s moment of truth time, turn the water on at the supply lines. Move the valve into the “on” position, and spend ten minutes “touching” the faucet on and off and alternately giggling like a school kid and basking in your DIY plumbing glory.