Kitchen Faucet Gasket Or Putty

3,750 posts, read 15,267,568 times Often... there is so little room there that when the faucet was installed onto that sink it gets done BEFORE the sink is set into the top. 25,522 posts, read 52,492,518 times Originally Posted by Barking Spider We tried the basin wrench with no luck. We did spray some WD40 on it but maybe try some more. I'm guessing it's a 9/16" so we will try the socket wrench next. I really don't want to take out the entire sink if we don't have to. There was plumbers putty around the base of the faucet at one time but it's 17 years old and leaks so it needs to be replaced. I might try an "oscilating multifunction tool" (aka Fein MultiMaster) but a Sawzall under a sink sounds like a recipe for either a trip to the emergancy room or at least video for "America's Funniest Home Remodeling Disasters"... The cold chisel trick is something that I have done safely, but if you don't have a nice sized ball pein hammer and some practice swinging it in confined quarters (or forearms like Popeye) it will take a long time to do it without damage to your counter's underside or your opposite hand.
I love my MultiMaster and with the right blades it will slice away any stubborn plumbing bolts! Oh Ikea… how do I love thee? I could go on forever counting the ways. For me, there is something cathartic about putting together your cute furniture, and a sense of accomplishment that comes along with it that is unlike most other things in this world. HOWEVER (and that is a BIG however), occasionally, you throw a major curve ball at me, and your other customers, and we have to figure out how to make the strange situation work for us.
Toilet Wax Ring Toxic This is a story of one of those curve balls.
Tyre Changer For Sale Sydney After redoing the main bathroom’s shower and all of the headache that came with it, I refused to go back to using my shitty master bath’s vanity, so I figured I could just “add that on” to the other project.
Headlight Bulbs For 2012 Kia Optima
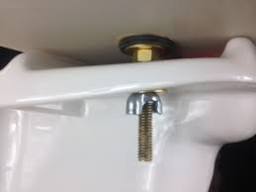
Most of all, it was easy fixes; there is nothing wrong with the shower in our master, and the floor is okay, so I just painted (sassy green!), and thought a new vanity and medicine cabinet was all I needed. For the most part, I have been 100% correct; I am totally happy with all of the somewhat minor changes that I have made. I LOVE the new cabinet, and the vanity is way more compact, and looks way more high end than the one that was in there since we moved in. However (there’s that word again!), I hit a snag when I went to connect the new faucet to the water supply line. As you can see in the above picture, the lines were just a little too short, but that wasn’t the real problem; the fitting was completely different than the fitting of my previous faucet, which meant that they would not connect to the supply lines. In fact, it should be stated to anyone that considers ever getting Ikea faucets, that their supply connection STANDARD is 1/2″ (which actually measures 1″ in diameter, which is just odd), not the 3/8″ standard for the United States (NOTE: I could be getting this backwards (but I’m pretty sure I’m not): Ikea says, “Connection hoses with 3/8″ connection included.”
, but I’m fairly certain it was a 1/2″ connector at the end of the supply line… regardless, it doesn’t fit.). So what does that mean, exactly? Well, it means that the Ikea supply connections are far bigger than the existing connections that come out of your wall, and well, to put it bluntly, it just won’t work. I found this interesting, because it isn’t mentioned ANYWHERE in the Ikea manual for the faucet. So here’s what I did: First, I googled the situation. I managed to find out that this is only a slightly known issue for those that have ventured into the realm of Swedish flat pack furniture, and lucky for me, there were solutions! So here’s what I had to do… 1) I went to Lowes, and was told they didn’t have what I needed. Don’t waste your time, go DIRECTLY to Ace Hardware, because they have everything you need; which differs from Steve’s (somewhat more complicated, sorry Steve!) solution I linked to above. Here’s what you will need: 2 connection adapters (not sure that’s what they are called);

these will be the connection between the Ikea hoses and your new hose. It should be 1/2″ on the Ikea end, and 3/8″ on the other end for the new hose. 2 new faucet connector hoses, standard 3/8″ fittings on each end. Now, here are some pictures, because this is incredibly difficult to explain just using words: This is the new hose that I was describing with the male/male adapter installed on top: This will be screwed into the Ikea faucet connector: Now, the the Ikea faucet is screwed into an adapter, and that adapter is now screwed into a hose that has the standard connector for the supply line coming out of the wall. This is what it looked like when I got everything all in: $25 dollars and a little elbow grease, and it works like a charm. Now, I don’t know why those hoses start at 12″, causing me to have to snake it around like that, but I don’t care as long as it fucking works, and it does. So, if you plan on getting a cute little sink, and oh-so-easy to install faucet to go with said sink, be sure to come back and reference this post.

It will save you time, because you won’t have to start out empty handed; you can get the adapters and new hoses before you start! Oh the joys of DIY home improvement… right?! Needless to say, I am more than happy with my “new” bathroom(s), and I can let out a sigh of relief and go back to loving Ikea wholeheartedly (even though I MAY have cursed their name a few points during the project); but don’t even get me started on that weird ass p-trap and the nonsense that went into getting that cluster fuck to work. UPDATE: It didn’t occur to me to post pictures of the sink/faucet (I was focused on the stress of getting the damn thing installed), but Shan’s request reminded me; so here you go: (I may update this with actual photos of MY cabinet/sink/faucet in the near future, so check back for that) Fix a faucet leaking from around the handle How to Fix a faucet leaking from around the handle This video is a do it yourself project which will show viewers how to fix a leaking kitchen faucet which is leaking water from around the base of the handle.