Pvc Towel Rack Rv

If you have an RV, or are considering buying one, you’ll also want to take a look at RV accessories from Sam’s Club. Sam’s Club has the RV accessories you need to protect your RV so that you and your family can enjoy it for years to come. These RV accessories are practical and affordable, so you’ll definitely want to take a look. One of the first things you’ll want to think about is where you are keeping your RV. Sam’s Club offers a low cost Round Top Garage measuring 10’6” x 32’ x 12’. It’s great not only for RVs, but for boats and heavy duty trucks as well, with a 100 commercial grade galvanized steel frame and a triple layer protected waterproof, UV treated PE uni-body cover back panel. You can also find wheel covers, extra tall Class A RV covers, and more. It doesn’t make sense to sink as much time and money as you have into purchasing and preparing your RV, and then not getting the accessories you need to protect it. With Sam’s Club, you don’t have to worry about getting gouged on the price, so go ahead and find the accessories you need at Sam’s Club today.
One of the biggest challenges of living in an RV is organizing! The closets and drawers aren’t normal sizes so trying to find RV storage solutions can be super tricky. Not only are you trying to find a home for everything you have to also worry about what will happen if you hit a big bump going down the road. Will things survive and stay in place? Many broken glasses and clothing disasters later, we have finally learned what does and does not work for RV living. Here are a few of the tips and tricks we have learned to organize our RV and we hope they can help you organize your traveling home on wheels. These things are amazing and work for all sorts of applications. Drink-ware, clothes, accessories, tools and so on and so on! They are not expensive and have lasted us for years. Available on Amazon: http://amzn.to/1PPVaPq We like these larger bins for sweaters, tops and pants. We see them in a variety of stores but they are also available on amazon: http://amzn.to/1RVkSER

Of course standard shoe boxes are always a great investment for organizing, but make sure it’s clear and comes with a lid. Here are some on Amazon that come in different sizes: http://amzn.to/1PPWotW A Lazy Susan with a lip and rubber to keep stuff from sliding around is surprisingly helpful in large cabinets, or in the fridge. Here’s the one we have: http://amzn.to/1RVlY3s In our Vesta our litter-box solution was fine but hasn’t worked well for our other RV’s due to layout. We now keep the litter box up front in the passenger foot area and are thinking of upgrading to this litter box to reduce the never ending spread of litter: http://amzn.to/1PPXwhg Is your RV still a hot mess? Don’t worry, we’ll add more organizing tips as we find them. Tell us your storage issues or favorite solutions in the comments below and we will try and cover them in the next update of Don’t Be a Hot Mess!Adjustable Permanent Mount Curved Shower Rod in Satin NickelAdjustable Permanent Mount Curved Shower Rod in Chrome

Carbon Steel Minimal Tension Shower Rod in WhiteAdjustable Tension Mount Curved Shower Rod in Brushed NickelAdjustable Straight Decorative Tension Shower Rod in Brushed NickelAdjustable Permanent Mount Double Curved Shower Rod in Brushed Nickel
Cat Scratching Post DarwinCarbon Steel Minimal Tension Shower Rod in Chrome
Homes For Sale Wilmington Nc ZillowCarbon Steel Larger End Caps Tension Shower Rod in Chrome
Delta Towel Bar Mounting BracketCarbon Steel Tension Shower Rod in Brushed NickelCarbon Steel Tiffany Finial Shower Rod in Brushed Nickel Draad Rustproof Solid Brass Shower Caddy 16 in. Double Shelf Corner Mount with Hook in Chrome "L" Style Tension Corner Pole Caddy in Satin Nickel with 4 Shelves Large Shower Basket in Brushed Stainless
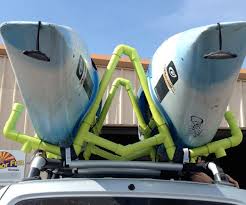
Adjustable Permanent Mount Curved Shower Rod in BronzeCarbon Steel Larger End Caps Tension Shower Rod in White Peva Medium 5 Gauge 42 in. W x 78 in. H Stall Liner in Frosted ClearCarbon Steel Minimal Tension Shower Rod in Cashmere Over-the-Showerhead Caddy in Satin Nickel Double Roller Shower Hook in Brushed NickelCarbon Steel Tiffany Finial Shower Rod in Chrome Peva Medium 5 Gauge 70 in. H Shower Liner in WhiteCarbon Steel Permanent Shower Rod in ChromeH Shower Liner in Frosted Clear 60 in. x 31 in. End Mount Shower Riser with Enclosure in ChromeShow All Items INTRODUCTION Roof racks for carrying 1+ kayaks can get pretty expensive (at least $100) for a transporting a single kayak and even more additional kayaks. This Instructable will show you how to build and mount a PVC Kayak Roof Rack/Carrier to your vehicle that can carry one or two kayaks. The total cost of this in its most basic form is about $80 (as of 2013). As shown in the pictures it is about $100 (as of 2013).

DISCLAIMER: I take no credit for this design, this Kayak Roof Rack/Carrier is based on the work of Niel Santos. I am uploading this Instructable because it is an awesome design that should not be lost to the internet (I only by chance came across it myself). The original plans for this Kayak Roof Rack/Carrier used to be available on Neil's website, however the site has since been taken down. If you need the original plans, I have made a PDF of them available for download at the following link: Original PVC Kayak Rack Plans - Google Drive. BUILD AND USE AT YOUR OWN RISK! Built properly you will have a great piece of equipment. Built improperly, this Kayak Roof Rack/Carrier could damage your vehicle, your kayaks or create a driving hazard for you and other drivers. Be safe, if not for yourself, do it for those around you. This Instructable assumes you already have a roof rack on your vehicle with two cross bars. If you do not have any type of roof rack, please see the original design on Neil's website for how to build and mount directly to a car roof.

We will be making a slightly modified version of Neil's original design and mounting it to a 2001 Nissan Xterra. During this Instructable, you may be using power tools and working with PVC primer and cement. Read all instructions with the equipment/materials and always use PPE (personal protective equipment). Don't chance losing a finger, or an eye, or passing out from noxious fumes. If you don't know how to do something or use a piece of equipment, please ask somebody that knows or look it up on YouTube before going at it on your own. MATERIALS You will need the following materials, all PVC piping is 1.5 inch diameter and everything can be bought at a hardware store like Home Depot, Lowe's, Ace Hardware and so on. - 2x 90 degree "street" elbows (or substitute for 45 degree street elbows, either will work). Street elbows have one male and one female end as opposed to regular elbows that have two female ends. - 10x 90 degree elbows. - 4x 45 degree elbows. - Minimum 20 feet of 1.5 inch PVC pipe.

You may need more depending on your vehicle. - PVC Primer and Cement (I found a double pack that had both together). - 4x 3/8 inch by 4 inch long bolts with hex nuts. Depending on how thick your PVC is, the bolt length may need to be shorter or longer. - 4x 8 foot, 200 pound rated lashing straps (not to be confused with Ratchet Tie-Downs) or U-Bolts. - 2x 24 inch bike tire inner tubes (found at any major retailer). OTHER MATERIALS AND TOOLS - PPE (personal protective equipment like goggles and gloves). - Compound miter saw (or hack saw, or PVC pipe cutter of appropriate size). - Drill and drill bits. - Large tarp or towel you do not mind getting stained/ruined. - Kitchen gloves (the traditional yellow ones) or other flexible gloves (Latex, Nitrile…) - Large, flat surface to work on in a well ventilated area (preferably outside).Step 1: Basic Skills Review - Using PVC Primer And Cement First you will need to know (or learn) how to use PVC primer and cement. I learned watching this video: How To Glue PVC Pipe Here is how I glued all my PVC pipes together, complete all steps without delay: 1. One application of primer to the female side of the joint (make sure coating is fairly even).