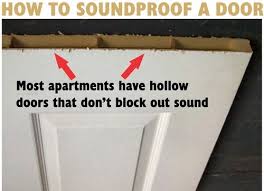
How To Hang Towel Bar On Hollow Core Door

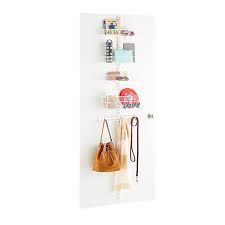
I ordered two of these and they are both great! We did mount them to a hollow core door so we got a different set of screws for these. VIGO Allure Square Chrome Towel Bar Shipping Showing options for 97818 $5.97 per order $7.97 per order $7.15 per item $9.97 per item Learn more about shipping costs & FREE pickup You searched: Find $11.36 When will it arrive ? $41.46 When will it arrive ? or Walmart stores Marketplace Retailers ship the items you buy from them Tracking details (if available) can be found in your Walmart account Done Phone: Email: Return Policy 4 double hooks for use in mudroom, office, kitchen, hallwayWall mounting hardware includedBrushed Nickel finish with Chrome accents — Made of durable steel with die-cast zinc hooks More about this item... InterDesign's Bruschia Wall Mount Rack is great for hall entries, bathrooms, bedrooms, and mudrooms. Made of durable steel and die-cast zinc hooks, it's easy to install with hardware included. InterDesign Bruschia Wall Mount Entryway Storage Rack for Jackets, Coats, Hats, Scarves, 4 Hooks, Brushed Nickel/Chrome:

4 double hooks for use in mudroom, office, kitchen, hallway Wall mounting hardware included Brushed Nickel finish with Chrome accents — Made of durable steel with die-cast zinc hooks Use in mudroom, office, kitchen, hallway 13" x 3" x 3.75" Specifications Recommended Room: Bathroom Condition: New Color: Silver Material: Metal Finish: Nickel Brand: InterDesign Number of Shelves: 0 Home Improvement Home Improvement Hardware Home Improvement Hardware Hooks Age 18-24 25-34 35-44 45-54 55-64 65 and older Gender Male Female Verified purchaser We needed a way to hang up articles of clothing or towels in our newly remodeled bathrooms and powder room where the faucet fixtures have a brushed nickel finish. The InterDesign Bruschia 4-Hook Rack has a brushed nickel base and polished chrome hooks that coordinate well with the other fixtures, and the width of the rack is very compatible with the width of each six-panel hollow core door to our bath rooms and powder room. In one case, a door mounting would have been impracticable as the mounted hooks would have hit a wall when the door was fully open.
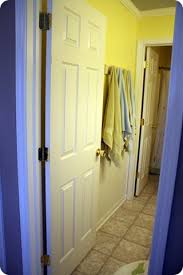
In this case, we mounted the rack in drywall location. Each rack has mounting hardware consisting of two screws and two plastic mounting sleeves; however, we used a "molly" bolt solution as a more reliable way to secure each rack to our doors or wall. Installation was quick and easy. CAUTION: Each hook is attached to the base plate with a pair of flanged nibs. While each hook ought to be capable of accommodating a load weighing only a few pounds, there would be no convenient way to reattach a hook to the base plate if you were to exceed the capacity of the flanged nibs. Yes (4) No (0) Report Yes (4) No (0) Verified purchaser Verified purchaser Easy to fit to the door with the supplied screws and the rack looks good. I use this as a towel rack but with hindsight I would have chosen a rack that has the hooks a little more spaced out. When removing one bath towel from the hook, the one next to it wants to come with it as the space between the hooks is not enough for the bath towels to hang freely.

It is still a nice rack, but I am going to relocate it and use it as a coat hanger for the kids.
Homes For Sale Kitale KenyaI'll look for one that has the hooks more spaced out for the bathroom.
Second Hand Furniture Campbelltown Yes (3) No (0) Report Yes (3) No (0) Verified purchaser Verified purchaser Bought it.
Teddy Bear Puppies WvMembers using the Family Locker room happy. Good enough for us. Yes (1) No (0) Report Yes (1) No (0) Verified purchaser Mounted this to a piece of wood and attached to bathroom door looks great. Yes (0) No (0) Report Yes (0) No (0) Verified purchaser The behind is more of a nickel and the hooks are more chrome, I was hoping to get an all brushed or all nickel look. The price is right though!
Yes (0) No (1) Report Yes (0) No (1) Verified purchaser It is shiny and steady. Verified purchaser We needed a way to hang up articles of clothing or towels in our newly remodeled bathrooms and powder room where the faucet fixtures have a brushed nickel finish. Yes (4) No (0) Verified purchaser Easy to fit to the door with the supplied screws and the rack looks good. Are the InterDesign Bruschia Racks' mounting screws non-ferrous? 2 answers What are the dimensions? 2 answers Is this product made in USA? Wellllll…it only took a year. (I say that a lot don’t I? It only took a month…six months…a year.) And I’m still not completely done. But 98 percent of our doors are rid of their look-away-or-the-shiny-will-blind-you brassiness. There’s a few reasons it’s taken so long. First, the order was messed up back when I ordered in February (of 2010!). I get easily distracted by other project I guess. Oh look, a butterfly! No really, it’s like that. So it took a while.

I ordered our new oil-rubbed bronze beauties from an online source called Your Home Supply. A sweet reader recommend them and their prices were pretty fantastic. Almost half of what I found at hardware stores. But there were a couple issues with my order – a few of the knobs had damage, I had accidentally ordered two slightly different bronze knobs (there’s oil rubbed bronze and dark bronze – watch that) and many of the pieces (knobs and hinges) just didn’t arrive. It took a couple weeks of calling, leaving messages and emails before I called one day and finally got a live person. She was great and took care of getting new knobs out to me really quick…but they still weren’t all there, even in the second batch. I guess I’d say try them out at your own risk? I think if you had an issue, they’d address and fix it, but it may take some time and persistence on your part. The prices are pretty great – so it may be worth the trouble! Anyhoo, I’m finally getting the last of the knobs installed.

I’ve been meaning to show you this process forever, so here we go! Here’s a before shot of the brass knobs on my son’s bathroom doors: I don’t know if I’ve ever showed you that room? It’s pretty darn cute. There are a few tools you’ll need, depending on your knobs. I needed a pencil, hammer, chisel, Phillips screwdriver and a drill (last two not pictured): You may not need the chisel, but more on that in a bit. I start with the hinges – so easy! Use your drill to take the old ones off: You don’t need to take the door off – just replace one hinge at a time. Take one old one off, put a new one on. You may need the hammer to dislodge the old hinge. It’s most likely been there for a while, and it will need a little push to get it off. (I knock it from below the hinge a few times and it works great.) So once your hinges are on, you’ll be squealing because it already looks so good, but it’s time to move on. There’s three kinds of knobs – you’ll want to be sure to get the right ones.

Privacy knobs are for bathrooms and bedrooms and they lock. Passage knobs don’t have a lock and turn freely – so for closets, etc. Dummy knobs are for spots like double doors – remember you’ll probably need two, one for each side of the door. This was the door to the bathroom, so it took a privacy knob: It’s so simple to take the old knob off – just use a Phillips screwdriver to take out the two screws: Take them out, and the two knobs will come easily apart: Here’s where it got a little dicey with my first shot at this…a year ago. Our previous hardware had a small round hole for the latch: The new hardware did not. It had a plate the latch was installed in. I thought this was going to be a major pain in the booty to deal with when I first realized this, it’s not a big deal at all. Hang in there folks…this is the fun part. Place the new latch in the hole, and hold it in the right spot. Then trace around it: Then, bust out your chisel and your Tool Man grunt and get to it.
First, place your chisel along your lines, and use a hammer to tap the chisel into the wood, going around your tracing. Then take the chisel and angle it so you can start chipping away at it, again using the hammer as you go: You want to mortise out that area so the latch will fit flush, or almost flush. It doesn’t have to be exactly right – just check it as you go. You’ll think you’re taking off a ton of wood, but it would be hard to make it too deep. Just keep checking here and there. I gotta tell you…using a chisel is way fun. It makes me feel all woodsmith-y. And it’s fun to see the instant gratification with each tap of the hammer. Once you get the depth right, just screw the latch in: It’s time to get your new knob, WHOO HOO! It will look something like this: Just take them apart, and put the part with the long pole into the latch. There’s a curved part on the pole that you’ll want to match up with the curvy part inside the door: It won’t go in if you have it wrong, so no worries.

You just have to match those up. Then place the other side on the back, and put your new screws in: I use a Phillips for this as well, with towel or rag up against the knob. I didn’t want to chance messing up the finish on the knobs. Here’s an important tidbit…most times the part of the knob with the screws will go on the inside of the room or the closet. With passage knobs, it doesn’t matter where you put them, but I like having them on the inside of the door. The important part – ALWAYS, always have a screwdriver with you and stay on the side of the door with the screws while installing. You’ll need to test the door here and there, and once and a while there may be a little something off. Sometimes, not often, but sometimes the door can latch just so in the process and may get jammed. You need to be able to take the knob off (with your screwdriver) if the door gets stuck. I had a few sweaty moments over the course of changing out all of the knobs in our house. And one of my BFFs may or may not have locked herself in the bathroom when this happened.

Not just the bathroom – her little bitty potty closet. We (I?) laugh about it now, but she says it was so scary to be stuck in there, with no way out. (She busted the knob to get herself out.) So anyway…keep the screwdriver, stay on the screws side, or at least have someone at home while you’re doing it. OK…we’re almost there peeps!! The only little bit left is the strike that’s in the door frame: The new strike comes with the knob. You’ll just remove the old one, and install the new one like you did the hinges. This is where you want to heed my earlier advice – you’ll need to test the door with the strike – sometimes things get a bit off in the process and they don’t fit perfectly together anymore. No biggie – just move the strike around a little, or chisel out a little from behind it, and you’ll be good to go!: Isn’t she lovely? I’m gaga over the contrast of the white doors and dark hardware: Right up my alley baby! I know I give brass a hard time…a little too much of a hard time?